
Apex 第 1 部分: 创建您的第一个 MVVM 应用程序
在十分钟内使用 Apex SDK 编写您的第一个 MVVM 应用程序!
系列文章
这是关于 Apex 和 MVVM 系列文章的一部分
什么是 Apex?
Apex 是我编写的一个框架,用于在 WPF、Silverlight 或 Windows Phone 7 中快速构建 MVVM 应用程序。
我发表过几篇涉及 Apex 相关主题的文章,其中一篇详细介绍了其内部机制。在本系列中,我将向您展示如何实际使用 Apex 通过 MVVM 设计模式构建真实世界的应用程序。
看起来很熟悉?我有几篇与 MVVM 基础和 Apex 内部机制相关的文章 - 这涵盖了部分相同内容,但却是将要涵盖新内容的系列文章的基础!
视频文章
这些文章中的每一篇都会有一个相关的视频。下面的视频包含了本文的内容 - 如果您更喜欢通过视频学习,那么观看视频而不是阅读文本几乎不会遗漏什么。
点击下方图片或链接直接进入视频

入门
要开始使用 Apex,您需要下载 Apex SDK。Apex SDK 将 Apex 二进制文件安装到全局程序集缓存中,并为 Visual Studio 添加了一些新功能。您可以从项目主页的首页获取 Apex SDK。
下载 SDK 后,请安装它 - 这会将扩展添加到 Visual Studio。
你的新项目
创建一个新的 WPF 应用程序,并将其命名为“Contacts”。我们将创建一个简单的应用程序来显示联系人列表的详细信息。现在我们有了新应用程序,请转到“项目 > 添加新项”。我们将创建第一个ViewModel - 一个用于Contact的ViewModel。您会发现 C# 分组中出现了一些新项 - 选择“Apex ViewModel”并将其命名为ContactViewModel.cs。

当我们创建一个新的ViewModel时,我们会得到下面的选项

这些选项仅用于在ViewModel中创建一些示例代码。我们可以为以下每种类型创建一个
一个通知属性
NotifyingProperty是一个属性,它将更新它所绑定的 UI 元素。当您以编程方式更改通知属性的值时,表示它的视觉元素会自动更新,反之亦然。这是 Apex 的关键元素。
一个可观察集合
可观察集合是一种工作方式类似于通知属性的集合 - 当它发生更改时,会自动更新关联的视图。
一个命令
命令是一个对象,它允许用户界面元素调用 ViewModel 的函数。我们稍后会更多地了解这些。
在这种情况下,我们不需要任何示例属性。现在,如果我们想要表示一个Contact,我们需要一些属性。我们将使此示例非常简单,因此我们只需要一个Name和一个Birthday属性。我们可以通过键入“apexnp”然后按两次 Tab 键来快速创建通知属性。“apexnp”是“Apex 通知属性”的代码片段 - 它会为我们提供类似下面的内容(先键入“Name”,然后按 Tab 键并键入“string”作为类型)。
/// <summary>
/// The NotifyingProperty for the Name property.
/// </summary>
private NotifyingProperty NameProperty =
    new NotifyingProperty("Name", typeof(string), default(string));

/// <summary>
/// Gets or sets Name.
/// </summary>
/// <value>The value of Name.</value>
public string Name
{
    get { return (string)GetValue(NameProperty); }
    set { SetValue(NameProperty, value); }
}
通知属性看起来是这样的 - 它们设计的一部分是为了尝试模拟DependencyProperties的定义方式,以保持熟悉感。
我们还需要一个用于Birthday的属性
/// <summary>
/// The NotifyingProperty for the Birthday property.
/// </summary>
private NotifyingProperty BirthdayProperty =
    new NotifyingProperty("Birthday", typeof(DateTime), DateTime.Today);

/// <summary>
/// Gets or sets Birthday.
/// </summary>
/// <value>The value of Birthday.</value>
public DateTime Birthday
{
    get { return (DateTime)GetValue(BirthdayProperty); }
    set { SetValue(BirthdayProperty, value); }
}
这足以构成一个Contact ViewModel - 它具有关键属性,并且它们被定义为通知属性,这意味着我们将能够绑定到它们。
主 ViewModel
现在向应用程序添加一个新的ViewModel,并将其命名为“MainViewModel”。这将是应用程序主视图的ViewModel - 显示联系人列表和选定的联系人。我们需要一个联系人列表在主ViewModel中 - 并且我们需要在视图更改时更新它,所以它必须是一个可观察集合。您可以像下面这样使用“apexoc”代码片段来创建ObservableCollection。
/// <summary>
/// The Contacts observable collection.
/// </summary>
private ObservableCollection<ContactViewModel> ContactsProperty =
    new ObservableCollection<ContactViewModel>();

/// <summary>
/// Gets the Contacts observable collection.
/// </summary>
/// <value>The Contacts observable collection.</value>
public ObservableCollection<ContactViewModel> Contacts
{
    get { return ContactsProperty; }
}
我们在主ViewModel上需要的最后一个属性是表示选定联系人的属性。添加一个类型为“ContactViewModel”的新通知属性 - 不要忘记使用“apexnp”代码片段!
/// <summary>
/// The NotifyingProperty for the SelectedContact property.
/// </summary>
private NotifyingProperty SelectedContactProperty =
    new NotifyingProperty("SelectedContact",
    typeof(ContactViewModel), default(ContactViewModel));

/// <summary>
/// Gets or sets SelectedContact.
/// </summary>
/// <value>The value of SelectedContact.</value>
public ContactViewModel SelectedContact
{
    get { return (ContactViewModel)GetValue(SelectedContactProperty); }
    set { SetValue(SelectedContactProperty, value); }
}
现在我们有了两个关键的ViewModel - 下一步是创建视图。
创建视图
从“项目 > 添加新项”,添加一个新的“Apex View”,并将其命名为“MainView”。这将是MainViewModel的表示层。因此,我们需要确保ViewModel类型为“MainViewModel”。
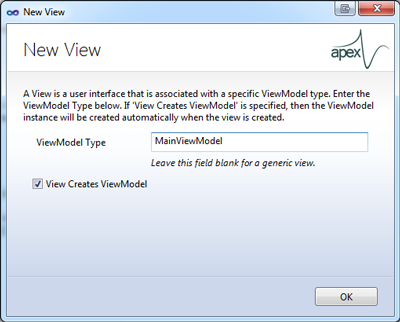
我们将有一个View实例作为应用程序的主要部分。由于我们还没有ViewModel实例,我们可以勾选允许视图创建它的选项。
我们还应该为联系人创建一个View - ContactView。在这种情况下,我们不希望创建ViewModel - 因为MainViewModel已经有了我们要绑定的ContactViewModel实例。ContactView非常简单,并由下面的 XAML 定义。
<UserControl x:Class="Contacts.ContactView"
             xmlns="http://schemas.microsoft.com/winfx/2006/xaml/presentation"
             xmlns:x="http://schemas.microsoft.com/winfx/2006/xaml"
             xmlns:mc="http://schemas.openxmlformats.org/markup-compatibility/2006"
             xmlns:d="http://schemas.microsoft.com/expression/blend/2008"
             xmlns:local="clr-namespace:Contacts"
             xmlns:apexMVVM="clr-namespace:Apex.MVVM;assembly=Apex"
             xmlns:apexCommands="clr-namespace:Apex.Commands;assembly=Apex"
             xmlns:apexControls="clr-namespace:Apex.Controls;assembly=Apex"
             xmlns:apexConverters="clr-namespace:Apex.Converters;assembly=Apex"
             mc:Ignorable="d"
             d:DesignHeight="300" d:DesignWidth="300">

    <apexControls:PaddedGrid Rows="Auto,Auto" Columns="*,2*" Padding="4">

        <!-- The Name label and textbox. -->
        <Label Grid.Row="0" Grid.Column="0" Content="Name" />
        <TextBox Grid.Row="0" Grid.Column="1" Text="{Binding Name}" />

        <!-- The Birthday label and textbox. -->
        <Label Grid.Row="1" Grid.Column="0" Content="Birthday" />
        <TextBox Grid.Row="1" Grid.Column="1" Text="{Binding Birthday}" />

    </apexControls:PaddedGrid>
</UserControl>
在这里,我们也使用了一个 Apex 控件 - Padded Grid。Padded Grid 是一个可以设置内边距的 Grid。
现在我们有了一个Contact的View - 我们可以构建应用程序的最终视图。这是MainView的代码。
<UserControl x:Class="Contacts.MainView"
             xmlns="http://schemas.microsoft.com/winfx/2006/xaml/presentation"
             xmlns:x="http://schemas.microsoft.com/winfx/2006/xaml"
             xmlns:mc="http://schemas.openxmlformats.org/markup-compatibility/2006"
             xmlns:d="http://schemas.microsoft.com/expression/blend/2008"
             xmlns:local="clr-namespace:Contacts"
             xmlns:apexMVVM="clr-namespace:Apex.MVVM;assembly=Apex"
             xmlns:apexCommands="clr-namespace:Apex.Commands;assembly=Apex"
             xmlns:apexControls="clr-namespace:Apex.Controls;assembly=Apex"
             xmlns:apexConverters="clr-namespace:Apex.Converters;assembly=Apex"
             mc:Ignorable="d"
             d:DesignHeight="300" d:DesignWidth="300">

    <!-- The View creates its own ViewModel, so set the ViewModel
    to a new instance of the ViewModel class. -->
    <apexMVVM:View.ViewModel>
        <local:MainViewModel x:Name="viewModel" />
    </apexMVVM:View.ViewModel>

    <apexControls:ApexGrid Columns="*,2*">

        <!-- The list of contacts. -->
        <ListBox Grid.Column="0" ItemsSource="{Binding Contacts}" DisplayMemberPath="Name"
                 SelectedItem="{Binding SelectedContact}" />

        <!-- A contact view - bound to the selected contact. -->
        <local:ContactView Grid.Column="1" DataContext="{Binding SelectedContact}" />

    </apexControls:ApexGrid>
</UserControl>
现在我们将此View的一个实例放入应用程序的主窗口。按F5会显示我们到目前为止所拥有的。它很基础,但这是一个很好的开始!
下一步
我们已经创建了一个 MVVM 应用程序的基础 - 一个好的开始!在本系列接下来的部分,我们将把这个Contact应用程序变得更具功能性。在此过程中,我们将看到 Apex 的其他一些功能。
历史
- 2012年5月21日:初始版本