
CinchV2: 我的 Cinch MVVM 框架的第 2 版:第 5 部分
4.87/5 (22投票s)
如果 Jack Daniels 制造 MVVM 框架。
目录
引言
上次我们讨论了 Cinch V2 的新功能和保持不变的功能。在本文中,我们将介绍 Cinch V2 WPF 演示应用程序,该应用程序随 Cinch V2 代码库一起在 Cinch 的 CodePlex 网站上提供。
正如我所承诺的,在每篇文章中,我都会展示 Cinch V2 兼容性矩阵。
兼容性矩阵列出了类及其一般工作区域,以及它们是否与WPF或SL或两者兼容。
| 工作区域 | 类名 | WPF | Silverlight(4或更高版本) | 两者 |
| 业务对象 | EditableValidatingObject.cs | 是 | ||
| 业务对象 | ValidatingObject.cs | 是 | ||
| 业务对象 | DataWrapper.cs | 是 | ||
| Commands | EventToCommandArgs.cs | 是 | ||
| Commands | SimpleCommand.cs | 是 | ||
| Commands | WeakEventHandlerManager.cs | 是 | ||
| 事件 | CloseRequestEventArgs.cs | 是 | ||
| 事件 | UICompletedEventArgs.cs | 是 | ||
| 弱事件 | WeakEvent.cs | 是 | ||
| 弱事件 | WeakEventHelper.cs | 是 | ||
| 弱事件 | WeakEventProxy.cs | 是 | ||
| 扩展方法 | DispatcherExtensions.cs | 是 | ||
| 扩展方法 | GenericListExtensions.cs | 是 | ||
| 交互行为 | CommandDrivenGoToStateAction.cs | 是 | ||
| 交互行为 | FocusBehaviourBase.cs | 是 | ||
| 交互行为 | NumericTextBoxBehaviour.cs | 是 | ||
| 交互行为 | SelectorDoubleClickCommandBehavior.cs | 是 | ||
| 交互行为 | TextBoxFocusBehavior.cs | 是 | ||
| 交互触发器 | CompletedAwareCommandTrigger.cs | 是 | ||
| 交互触发器 | CompletedAwareGotoStateCommandTrigger.cs | 是 | ||
| 交互触发器 | EventToCommandTrigger.cs | 是 | ||
| 消息中介者 | MediatorMessageSinkAttribute.cs | 是 | ||
| 消息中介者 | MediatorSingleton.cs | 是 | ||
| 服务实现 | ChildWindowService.cs | 是 | ||
| 服务实现 | SLMessageBoxService.cs | 是 | ||
| 服务实现 | ViewAwareStatus.cs | 是 | ||
| 服务实现 | ViewAwareStatusWindow.cs | 是 | ||
| 服务实现 | VSMService.cs | 是 | ||
| 服务实现 | WPFMessageBoxService.cs | 是 | ||
| 服务实现 | WPFOpenFileService.cs | 是 | ||
| 服务实现 | WPFSaveFileService.cs | 是 | ||
| 服务实现 | WPFUIVisualizerService.cs | 是 | ||
| 服务接口 | IChildWindowService.cs | 是 | ||
| 服务接口 | IMessageBoxService.cs | 是 | ||
| 服务接口 | IViewAwareStatus.cs | 是 | ||
| 服务接口 | IViewAwareStatusWindow.cs | 是 | ||
| 服务接口 | IVSM.cs | 是 | ||
| 服务接口 | IMessageBoxService.cs | 是 | ||
| 服务接口 | IOpenFileService.cs | 是 | ||
| 服务接口 | ISaveFileService.cs | 是 | ||
| 服务接口 | IUIVisualizerService.cs | 是 | ||
| 服务测试实现 | TestChildWindowService.cs | 是 | ||
| 服务测试实现 | TestMessageBoxService.cs | 是 | ||
| 服务测试实现 | TestViewAwareStatus.cs | 是 | ||
| 服务测试实现 | TestViewAwareStatusWindow.cs | 是 | ||
| 服务测试实现 | TestVSMService.cs | 是 | ||
| 服务测试实现 | TestMessageBoxService.cs | 是 | ||
| 服务测试实现 | TestOpenFileService.cs | 是 | ||
| 服务测试实现 | TestSaveFileService.cs | 是 | ||
| 服务测试实现 | TestUIVisualizerService.cs | 是 | ||
| 多线程 | AddRangeObservableCollection.cs(这是一个特定的 SL 实现) | 是 | ||
| 多线程 | AddRangeObservableCollection.cs(这是特定的 WPF 实现) | 是 | ||
| 多线程 | BackgroundTaskManager.cs | 是 | ||
| 多线程 | ISynchronizationContext.cs | 是 | ||
| 多线程 | UISynchronizationContext.cs | 是 | ||
| 多线程 | ApplicationHelper.cs | 是 | ||
| 多线程 | DispatcherNotifiedObservableCollection.cs | 是 | ||
| 菜单 | CinchMenuItem.cs | 是 | ||
| 实用程序 | ArgumentValidator.cs | 是 | ||
| 实用程序 | IWeakEventListener.cs(这是 SL 中缺失的 System 类,所以我创建了一个) |
是 | ||
| 实用程序 | ObservableHelper.cs | 是 | ||
| 实用程序 | PropertyChangedEventManager.cs(这是 SL 中缺失的 System 类,所以我创建了一个) |
是 | ||
| 实用程序 | PropertyObserver.cs | 是 | ||
| 实用程序 | BindingEvaluator.cs | 是 | ||
| 实用程序 | ObservableDictionary.cs | 是 | ||
| 实用程序 | TreeHelper.cs | 是 | ||
| 验证 | RegexRule.cs | 是 | ||
| 验证 | Rule.cs | 是 | ||
| 验证 | SimpleRule.cs | 是 | ||
| ViewModels | EditableValidatingViewModelBase.cs | 是 | ||
| ViewModels | IViewStatusAwareInjectionAware.cs | 是 | ||
| ViewModels | ValidatingViewModelBase.cs | 是 | ||
| ViewModels | ViewMode.cs | 是 | ||
| ViewModels | ViewModelBase.cs | 是 | ||
| ViewModels | ViewModelBaseSLSpecific.cs | 是 | ||
| ViewModels | ViewModelBaseWPFSpecific.cs | 是 | ||
| Workspaces | ChildWindowResolver.cs | 是 | ||
| Workspaces | CinchBootStrapper.cs(SL 版本) | 是 | ||
| Workspaces | CinchBootStrapper.cs(WPF版本) | 是 | ||
| Workspaces | PopupNameToViewLookupKeyMetadataAttribute.cs | 是 | ||
| Workspaces | IWorkspaceAware.cs | 是 | ||
| Workspaces | MockView.cs | 是 | ||
| Workspaces | NavProps.cs | 是 | ||
| Workspaces | PopupResolver.cs | 是 | ||
| Workspaces | ViewnameToViewLookupKeyMetadataAttribute.cs | 是 | ||
| Workspaces | ViewResolver.cs | 是 | ||
| Workspaces | WorkspaceData.cs | 是 |
既然我已经向您展示了哪些类可以与 WPF/SL 兼容,那么让我们继续阅读本文的其余部分,好吗?但在此之前,这里是旧的 Cinch V1 文章的链接。
如果您错过了 Cinch V1,并且对 MVVM 感兴趣,我强烈建议您首先阅读所有 Cinch V1 文章,因为这将使您对这些 Cinch V2 文章中将要介绍的内容有更深入的理解。
CinchV1 文章链接
有些人可能从未见过旧的 Cinch V1 文章,因此我也会在这里列出这些文章,并且在 Cinch V2 仍然使用与 Cinch V1 相同的功能时,我将引导人们阅读这些文章。
- Cinch入门文章
- Cinch及其内部机制的演练 I
- Cinch及其内部机制的演练 II
- 如何使用Cinch开发ViewModels
- 如何使用 Cinch 进行 ViewModel 的单元测试,包括如何测试 Cinch ViewModel 中可能运行的后台工作线程。
- 使用Cinch的演示应用程序
CinchV2 文章链接
- CinchV2:简介和 MEFedMVVM 以及 ViewModel/Service 解析
- CinchV2:服务/UI 服务
- CinchV2:全新内容
- CinchV2:深入解析变化和不变之处
- CinchV2:剖析 WPF 演示应用程序(本文)
- 剖析 SL4 演示应用程序
好的,这就是文章路线图的样子。我想现在是时候深入研究本文的实质内容了,所以我们开始吧
它有什么功能
对于 Cinch V1,我创建了一个 LOB(业务线)应用程序,但在工作中,我正在开发一个大型 LOB 应用程序,说实话,我只是厌倦了创建另一个 LOB 应用程序,而且 Cinch V1 和 V2 之间的共同点在旧的 Cinch V1 演示中可以非常清楚地看到。真正改变的是 UI 服务,并且附加属性现在已成为 Blend 行为。
所以这次我决定做一些更有创意的事情,这让一些读者感到沮丧。然而,一些读者可能会很高兴地知道,我已经被另外两个使用 Cinch 的 CodeProject 用户联系,其中一个将编写一篇 Cinch V2 LOB 文章,另一个将编写一个 VB.NET Cinch V2 应用程序,当这些 CodeProject 用户告诉我他们完成文章编写后,我将从 Cinch CodePlex 网站链接到这两个应用程序。
无论如何,那都不是重点。正如我所说,我决定做一些不同的事情。那么,WPF 演示应用程序有什么功能呢?
嗯,我想这可以用以下几点来概括
- 创建一个带选项卡的主界面,允许显示 n 个可关闭的选项卡,其中每个选项卡可以是“关于”选项卡或“图像查看器”选项卡。
- 创建一个图像查看器视图,显示来自特定文件夹(在 App.Config 中指定)的图像,并允许用户对每个图像进行评分,以及保存和加载每个图像收到的评分。
- 创建一个“关于”视图,允许用户打开一个弹出窗口以查看各种网站。
现在,这看起来可能不多,但相信我,这足以展示 Cinch 的大部分功能。
它长什么样
现在我已经谈论了它的功能,让我们来看看它长什么样,好吗?
当您启动应用程序时,它应该看起来像这样(请记住更改 App.Config 以指向您有一些图像的位置)。

从上图中可以看出,它是一个单窗口应用程序。主窗口名为 MainWindow,它有一个 TabControl,其中托管着许多视图。此 TabControl 通过 MainWindowViewModel 中的 ObservableCollection<WorkSpaceData> 填充。
您在下面看到的第一个视图名为 ImageLoaderView,它只是显示您 PC 中的许多图像。使用的路径在 App.Config 中配置。
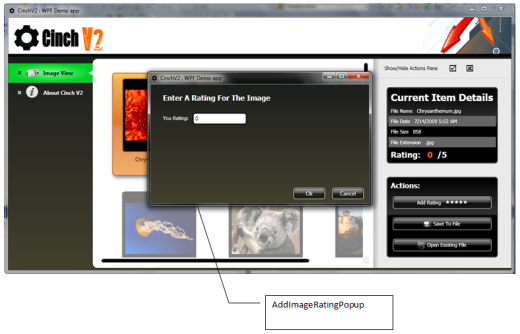
从 ImageLoaderView 中,可以使用“添加评分”按钮启动 AddImageRatingPopup。显然,弹出窗口的显示实际上是在名为 ImageLoaderViewModel 的 ViewModel 中完成的。

MainWindow 中显示的下一个视图名为 AboutView,它使用了 AboutViewModel。

从 AboutView 中,还可以启动 AboutViewLinkRequestedPopup。此弹出窗口的显示是在 AboutViewModel 中完成的。
整体结构
下图说明了 WPF 演示应用程序的视图/视图模型和弹出窗口的整体结构。还有许多辅助类和服务,但我将在遇到它们时讨论。现在,只需注意下面所示的 WPF 演示应用程序的整体结构

它是如何工作的
接下来的三个部分将尝试概述 WPF 演示应用程序中视图/视图模型和弹出窗口执行的所有功能。
弹出窗口
在本节中,我们将讨论如何从您的视图模型中显示弹出窗口。
确保弹出窗口可供显示
你们中的一些人可能熟悉早期的 Cinch 文章,甚至因为您使用过 Cinch V1 而熟悉所有这些工作原理,但是你们中的一些人可能不知道,所以对于那些新手来说,基本思想如下
有一个处理显示弹出窗口的服务,名为 IUIVisualizerService,它包含一个 Dictionary<string, Type>,这样 IUIVisualizerService 的使用者可以简单地通过名称 (string) 从内部 Dictionary<string, Type> 请求一个弹出窗口,然后 IUIVisualizerService 将在 Dictionary<string, Type> 中找到该条目并创建该 Type 的新实例并显示它。
为了清楚起见,这是 WPF 的完整 IUIVisualizerService 服务实现
using System;
using System.Collections.Generic;
using System.Windows;
using System.ComponentModel.Composition;
using MEFedMVVM.ViewModelLocator;

namespace Cinch
{
    /// <summary>
    /// This class implements the IUIVisualizerService for WPF purposes.
    /// If you have attributed up your views
    /// using the ViewnameToViewLookupKeyMetadataAttribute
    /// Registration of Views with the IUIVisualizerService service is automatic.
    /// However you can still register views manually, to do this
    /// simply put some lines like this in you App.Xaml.cs
    /// ViewModelRepository.Instance.Resolver.Container.
    ///   GetExport<IUIVisualizerService>().Value.Register(
    ///   "MainWindow", typeof(MainWindow));
    /// </summary>
    [PartCreationPolicy(CreationPolicy.Shared)]
    [ExportService(ServiceType.Both, typeof(IUIVisualizerService))]
    public class WPFUIVisualizerService : IUIVisualizerService
    {
        #region Data
        private readonly Dictionary<string, Type> _registeredWindows;
        #endregion

        #region Ctor
        public WPFUIVisualizerService()
        {
            _registeredWindows = new Dictionary<string, Type>();
        }
        #endregion

        #region Public Methods
        /// <summary>
        /// Registers a collection of entries
        /// </summary>
        /// <param name="startupData"></param>
        public void Register(Dictionary<string, Type> startupData)
        {
            foreach (var entry in startupData)
                Register(entry.Key, entry.Value);
        }

        /// <summary>
        /// Registers a type through a key.
        /// </summary>
        /// <param name="key">Key for the UI dialog</param>
        /// <param name="winType">Type which implements dialog</param>
        public void Register(string key, Type winType)
        {
            if (string.IsNullOrEmpty(key))
                throw new ArgumentNullException("key");
            if (winType == null)
                throw new ArgumentNullException("winType");
            if (!typeof(Window).IsAssignableFrom(winType))
                throw new ArgumentException("winType must be of type Window");

            lock (_registeredWindows)
            {
                _registeredWindows.Add(key, winType);
            }
        }

        /// <summary>
        /// This unregisters a type and removes it from the mapping
        /// </summary>
        /// <param name="key">Key to remove</param>
        /// <returns>True/False success</returns>
        public bool Unregister(string key)
        {
            if (string.IsNullOrEmpty(key))
                throw new ArgumentNullException("key");

            lock (_registeredWindows)
            {
                return _registeredWindows.Remove(key);
            }
        }

        /// <summary>
        /// This method displays a modaless dialog associated with the given key.
        /// </summary>
        /// <param name="key">Key previously
        ///     registered with the UI controller.</param>
        /// <param name="state">Object state
        ///     to associate with the dialog</param>
        /// <param name="setOwner">Set the owner of the window</param>
        /// <param name="completedProc">Callback used
        ///     when UI closes (may be null)</param>
        /// <returns>True/False if UI is displayed</returns>
        public bool Show(string key, object state, bool setOwner,
            EventHandler<UICompletedEventArgs> completedProc)
        {
            Window win = CreateWindow(key, state, setOwner, completedProc, false);
            if (win != null)
            {
                win.Show();
                return true;
            }
            return false;
        }

        /// <summary>
        /// This method displays a modal dialog associated with the given key.
        /// </summary>
        /// <param name="key">Key previously
        ///    registered with the UI controller.</param>
        /// <param name="state">Object state
        ///    to associate with the dialog</param>
        /// <returns>True/False if UI is displayed.</returns>
        public bool? ShowDialog(string key, object state)
        {
            Window win = CreateWindow(key, state, true, null, true);
            if (win != null)
                return win.ShowDialog();

            return false;
        }
        #endregion

        #region Private Methods
        /// <summary>
        /// This creates the WPF window from a key.
        /// </summary>
        /// <param name="key">Key</param>
        /// <param name="dataContext">DataContext (state) object</param>
        /// <param name="setOwner">True/False to set ownership to MainWindow</param>
        /// <param name="completedProc">Callback</param>
        /// <param name="isModal">True if this is a ShowDialog request</param>
        /// <returns>Success code</returns>
        private Window CreateWindow(string key, object dataContext, bool setOwner,
            EventHandler<UICompletedEventArgs> completedProc, bool isModal)
        {
            if (string.IsNullOrEmpty(key))
                throw new ArgumentNullException("key");

            Type winType;
            lock (_registeredWindows)
            {
                if (!_registeredWindows.TryGetValue(key, out winType))
                    return null;
            }

            var win = (Window)Activator.CreateInstance(winType);

            if (dataContext is IViewStatusAwareInjectionAware)
            {
                IViewAwareStatus viewAwareStatus =
                  ViewModelRepository.Instance.Resolver.Container.
                  GetExport<IViewAwareStatus>().Value;
                viewAwareStatus.InjectContext((FrameworkElement)win);
                ((IViewStatusAwareInjectionAware)
                  dataContext).InitialiseViewAwareService(viewAwareStatus);
            }

            win.DataContext = dataContext;

            if (setOwner)
                win.Owner = Application.Current.MainWindow;

            if (dataContext != null)
            {
                var bvm = dataContext as ViewModelBase;
                if (bvm != null)
                {
                    if (isModal)
                    {
                        bvm.CloseRequest +=
                          ((EventHandler<CloseRequestEventArgs>)((s, e) =>
                        {
                            try
                            {
                                win.DialogResult = e.Result;
                            }
                            catch (InvalidOperationException)
                            {
                                win.Close();
                            }
                        })).MakeWeak(eh => bvm.CloseRequest -= eh);
                    }
                    else
                    {
                        bvm.CloseRequest +=
                          ((EventHandler<CloseRequestEventArgs>)((s, e) =>
                            win.Close())).MakeWeak(eh => bvm.CloseRequest -= eh);
                    }
                    bvm.ActivateRequest +=
                      ((EventHandler<EventArgs>)((s, e) => win.Activate())).MakeWeak(
                        eh => bvm.ActivateRequest -= eh);
                }
            }

            win.Closed += (s, e) =>
            {
                if (completedProc != null)
                {
                    completedProc(this, new UICompletedEventArgs()
                    {
                        State = dataContext,
                        Result = (isModal) ? win.DialogResult : null
                    });
                }
            };

            return win;
        }
        #endregion
    }
}
欲了解更多信息,请参阅链接:CinchV2_2.aspx#CoreServices 并阅读 WPFUIVisualizerService 部分。
您可能想知道 IUIVisualizerService Dictionary<string, Type> 是如何及时填充的,以确保当请求弹出窗口时,它存在于 Dictionary<string, Type> 中。嗯,这可以通过两种不同的方式发生。
手动向字典中添加项目
您可以在适当的时候手动将弹出窗口项目添加到 IUIVisualizerService Dictionary<string, Type> 中,例如在应用程序构建或甚至启动时。因此,您可能会有这样的代码
public partial class App : Application
{
    public App()
    {
        ViewModelRepository.Instance.Resolver.Container.
            GetExport<IUIVisualizerService>().Value.Register(
                "AddImageRatingPopup",
                typeof(AddImageRatingPopup));

        InitializeComponent();
    }
}
该行将确保 IUIVisualizerService Dictionary<string, Type> 使用正确的 KeyValuePair 进行填充。
自动查找作为弹出窗口的类型
手动添加东西固然很好,但 Cinch V2 提供了一种更好的方法,通过使用属性和在启动时运行的引导程序。因此,如果我们有一个我们知道将与 IUIVisualizerService 一起使用的弹出窗口,我们只需在其代码隐藏中按如下方式对其进行属性化
[PopupNameToViewLookupKeyMetadata("AddImageRatingPopup",typeof(AddImageRatingPopup))]
public partial class AddImageRatingPopup : Window
{
}
因此,我们现在有了一个带有属性的弹出窗口,但这只是一半的故事,我们需要确保有东西检查这些 PopupNameToViewLookupKeyMetadata 属性。这就是 CinchBootStrapper 的工作。基本上,CinchBootStrapper 接受一个 IEnumerable<Assembly> 来检查传入的 IEnumerable<Assembly> 中带有 PopupNameToViewLookupKeyMetadata 属性的 Type,如果它们有,则将它们添加到 IUIVisualizerService 中,以备后用。您所要做的就是确保在应用程序构建或应用程序启动时调用 CinchBootStrapper。
这是一个来自 Cinch V2 WPF 演示应用程序的示例
/// <summary>
/// Interaction logic for App.xaml
/// </summary>
public partial class App : Application
{
    #region Initialisation
    /// <summary>
    /// Initiliase Cinch using the CinchBootStrapper.
    /// </summary>
    public App()
    {
        CinchBootStrapper.Initialise(new List<Assembly> { typeof(App).Assembly });
        InitializeComponent();
    }
    #endregion
}
显示特定弹出窗口
因此,一旦您在 IUIVisualizerService Dictionary<string, Type> 中有一个带有 KeyValuePair 条目的弹出窗口,从 ViewModel 显示弹出窗口就非常简单了。您只需这样做
namespace CinchV2DemoWPF
{
    [ExportViewModel("AboutViewModel")]
    [PartCreationPolicy(CreationPolicy.NonShared)]
    public class AboutViewModel : ViewModelBase
    {
        public IUIVisualizerService uiVisualizer;

        [ImportingConstructor]
        public AboutViewModel(IUIVisualizerService uiVisualizer)
        {

            this.uiVisualizer = uiVisualizer;
            AboutViewEventToVMFiredCommand =
              new SimpleCommand<Object, EventToCommandArgs>(
              ExecuteAboutViewEventToVMFiredCommand);
        }
        #endregion

        private void ExecuteAboutViewEventToVMFiredCommand(EventToCommandArgs args)
        {
            //Create popups ViewModel
            AboutViewLinkRequestedPopupViewModel aboutViewLinkRequestedPopupViewModel =
                new AboutViewLinkRequestedPopupViewModel();

            switch ((String)args.CommandParameter)
            {
                case "Home":
                    aboutViewLinkRequestedPopupViewModel.NavigateTo =
                        @"http://cinch.codeplex.com/";
                    break;
                case "Source":
                    aboutViewLinkRequestedPopupViewModel.NavigateTo =
                        @"http://cinch.codeplex.com/SourceControl/list/changesets";
                    break;
            }
            //show popup
            uiVisualizer.ShowDialog("AboutViewLinkRequestedPopup",
                                    aboutViewLinkRequestedPopupViewModel);
        }
    }
}
Cinch V2 还提供了 IUIVisualizerService 的测试替身,您可以用于测试,它的工作原理与此处描述的非常相似:CinchV.aspx#UIVisualizer。唯一的区别是您不再需要为 IUIVisualizerService 解析任何东西,您只需将 TestUIVisualizerService 注入到您正在测试的 ViewModel 中。
这种差异是由于 Cinch V1 处理服务的方式,使用 DI/IOC 和常见的 ServiceLocator 模式。而 Cinch V2 只依赖于通过构造函数参数或属性设置器注入的所有内容。因此,如果您想使用服务的测试版本,您只需从单元测试代码中注入测试版本(上面示例中的 TestUIVisualizerService),而不是真实版本。
应用程序管理
要使演示应用程序正常工作,实际上只需要两件事,它们如下所示
App.Config
您必须在 App.Config 中指定一个有效的图像位置,以便应用程序正常工作。这是我的 App.Config 文件在我运行家庭演示应用程序时的样子
<?xml version="1.0" encoding="utf-8" ?>
<configuration>
  <appSettings>
    <add key="YourImagePath"
      value="C:\Users\Public\Pictures\Sample Pictures"/>
  </appSettings>
</configuration>
应用程序构建
正如我在上面的弹出窗口部分中提到的,Cinch V2 支持通过使用属性进行弹出窗口查找和各种其他查找,其中在启动时找到具有这些属性的 Type。但为了使其正常工作,需要告诉 Cinch 要查看哪些程序集。对于演示应用程序,所有视图/弹出窗口都在与演示相同的程序集中定义,因此我只需要告诉 Cinch 在该程序集中查找 Cinch 属性的 Type。这是通过应用程序构造函数中的以下代码完成的
/// <summary>
/// Interaction logic for App.xaml
/// </summary>
public partial class App : Application
{
    #region Initialisation
    /// <summary>
    /// Tell Cinch what Assemblies to look in for Cinch attributed types that
    /// can be cached, to prevent the user from manually having to add things
    /// to lookup Dictionaries later
    /// </summary>
    public App()
    {
        CinchBootStrapper.Initialise(
          new List<Assembly> { typeof(App).Assembly });
        InitializeComponent();
    }
    #endregion
}
Cinch BootStrapper 接受 IEnumerable<Assembly>,因此如果将弹出窗口拆分为不同的程序集,您可以传入其他 DLL。
视图/视图模型
Cinch V2 WPF 演示应用程序中有许多视图模型。因此,我们将依次检查它们,并了解视图/视图模型如何协同工作。
主窗口 / 主窗口视图模型
MainWindow 仅充当容器,用于在我在另一篇 Cinch V2 文章中提到的专用 TabControl 中托管许多其他视图:CinchV2_3.aspx#Workspaces。
首先阅读该部分,然后您会更好地理解本部分。正如我所说,MainWindow 只是在专用的 TabControl 中托管其他视图,所以让我们看看 MainWindow 的 XAML。
<Window
    xmlns="http://schemas.microsoft.com/winfx/2006/xaml/presentation"
    xmlns:x="http://schemas.microsoft.com/winfx/2006/xaml"
    xmlns:CinchV2="clr-namespace:Cinch;assembly=Cinch.WPF"
    xmlns:meffed="http:\\www.codeplex.com\MEFedMVVM"
    xmlns:local="clr-namespace:CinchV2DemoWPF;assembly="
    xmlns:Microsoft_Windows_Themes=
      "clr-namespace:Microsoft.Windows.Themes;
       assembly=PresentationFramework.Aero"
    x:Class="CinchV2DemoWPF.MainWindow"
    Icon="/CinchV2DemoWPF;component/Images/CinchIcon.png"
    Title="CinchV2 : WPF Demo app"
    MinHeight="600"
    MinWidth="800"
    WindowState="Maximized"
    WindowStartupLocation="CenterScreen"
    meffed:ViewModelLocator.ViewModel="MainWindowViewModel">

    <Window.Resources>
        <DataTemplate DataType="{x:Type CinchV2:WorkspaceData}">
            <AdornerDecorator>
                <Border HorizontalAlignment="Stretch"
                        VerticalAlignment="Stretch"
                        CinchV2:NavProps.ViewCreator="{Binding}"/>
            </AdornerDecorator>
        </DataTemplate>
    </Window.Resources>

    <Grid>
         ......
         ......
         ......
         ......
        <local:TabControlEx Grid.Row="1" x:Name="tab1"
            ItemsSource="{Binding Views}"  TabStripPlacement="Left"
                CinchV2:NavProps.ShouldHideHostWhenNoItems="true"
                ItemContainerStyle="{StaticResource TabItemStyleVerticalTabs}"
                Style="{DynamicResource TabControlStyleVerticalTabs}"
                IsSynchronizedWithCurrentItem="True"
                DisplayMemberPath="DisplayText">

            <local:TabControlEx.ContextMenu>
                <ContextMenu IsOpen="{Binding ShowContextMenu, Mode=OneWay}">
                    <Menu x:Name="menu" Margin="0,0,0,0"
                        Height="Auto" Foreground="Black"
                        ItemContainerStyle="{StaticResource ContextMenuItemStyle}"
                        ItemsSource="{Binding MainWindowOptions}"
                        BorderBrush="Transparent"
                        VerticalAlignment="Top"
                        Background="Transparent" />
                </ContextMenu>
            </local:TabControlEx.ContextMenu>
        </local:TabControlEx>
    </Grid>
</Window>
可以看出,有一个 TabControlEx 和一个 ContextMenu,以及 MeffedMVVM ViewModelLocator.ViewModel 附加 DP 来解析 ViewModel。现在让我们将注意力转向 MainWindowViewModel,看看它长什么样,我们期望它提供以下功能
ContextMenu支持。TabControlEx项目的一些初始WorkSpace。
这是 MainWindowViewModel 中相关代码,我们确实可以看到我们刚才提到的两个功能都已满足。此 MainWindowViewModel 提供 List<CinchMenuItem> MainWindowOptions 属性,该属性在 MainWindow 中用作 ContextMenu,它还将 WorkspaceData 项目添加到 Views 属性中,该属性在 MainWindow 中用作 TabControl 的 ItemsSource。
/// <summary>
/// This ViewModel demonstrates how to use WorkSpaces and Menus. You will
/// need to look in the MainWindow.xaml and also the AppStyles.xaml ResourceDictionary
/// to see how the Styles are used to tie up with this ViewModel
/// </summary>
[ExportViewModel("MainWindowViewModel")]
[PartCreationPolicy(CreationPolicy.NonShared)]
public class MainWindowViewModel : ViewModelBase
{
    #region Data
    private bool showContextMenu = false;
    private IViewAwareStatus viewAwareStatusService;
    #endregion

    #region Ctor
    [ImportingConstructor]
    public MainWindowViewModel(IViewAwareStatus viewAwareStatusService)
    {
        this.viewAwareStatusService = viewAwareStatusService;
        this.viewAwareStatusService.ViewLoaded += ViewAwareStatusService_ViewLoaded;
    }
    #endregion

    #region Private Methods
    /// <summary>
    /// Creates and returns the menu items
    /// </summary>
    private List<CinchMenuItem> CreateMenus()
    {

        List<CinchMenuItem> menu = new List<CinchMenuItem>();

        CinchMenuItem menuActions = new CinchMenuItem("Actions");
        menu.Add(menuActions);

        CinchMenuItem menuAbout = new CinchMenuItem("About CinchV2");
        menuAbout.Command = new SimpleCommand<object, object>((x) =>
        {
            WorkspaceData workspace2 =
                new WorkspaceData(@"/CinchV2DemoWPF;component/Images/About.png",
                "AboutView", null, "About Cinch V2", true);
            Views.Add(workspace2);
            ShowContextMenu = false;
        });
        menuActions.Children.Add(menuAbout);


        CinchMenuItem menuImages = new CinchMenuItem("ImageLoaderView");
        menuImages.Command = new SimpleCommand<object, object>((x) =>
        {
            String imagePath =
              ConfigurationManager.AppSettings["YourImagePath"].ToString();

            WorkspaceData workspaceImages =
                new WorkspaceData(@"/CinchV2DemoWPF;component/Images/imageIcon.png",
                "ImageLoaderView", imagePath, "Image View", true);
            Views.Add(workspaceImages);
            ShowContextMenu = false;
        });
        menuActions.Children.Add(menuImages);

        return menu;
    }

    private void ViewAwareStatusService_ViewLoaded()
    {

        if (Designer.IsInDesignMode)
            return;

        String imagePath =
          ConfigurationManager.AppSettings["YourImagePath"].ToString();

        WorkspaceData workspace1 =
            new WorkspaceData(@"/CinchV2DemoWPF;component/Images/imageIcon.png",
            "ImageLoaderView", imagePath, "Image View", true);

        WorkspaceData workspace2 =
           new WorkspaceData(@"/CinchV2DemoWPF;component/Images/About.png",
           "AboutView", null, "About Cinch V2", true);

        Views.Add(workspace1);
        Views.Add(workspace2);
        SetActiveWorkspace(workspace1);
    }
    #endregion

    #region Public Properties
    /// <summary>
    /// Returns the bindbable Main Window options
    /// </summary>
    public List<CinchMenuItem> MainWindowOptions
    {
        get
        {
            return CreateMenus();
        }
    }

    /// <summary>
    /// ShowContextMenu
    /// </summary>
    static PropertyChangedEventArgs showContextMenuArgs =
        ObservableHelper.CreateArgs<MainWindowViewModel>(x => x.ShowContextMenu);

    public bool ShowContextMenu
    {
        get { return showContextMenu; }
        private set
        {
            showContextMenu = value;
            NotifyPropertyChanged(showContextMenuArgs);
        }
    }
    #endregion

}
ImageLoaderView / ImageLoaderViewModel
ImageLoaderViewModel 是 Cinch V2 WPF 演示应用程序中最复杂的一个,它执行以下功能
- 加载一组图像(文件夹在 App.Config 中指定),这些图像使用非核心服务加载,还提供了设计时版本。
- 允许使用反向的
SimpleCommand和CompletedAwareCommandTrigger来显示/隐藏操作区域。 - 允许打开评级弹出窗口(下面描述的
AddImageRatingPopup)。 - 使用各种其他标准服务,如
MessageBoxService/SaveFileService/OpenFileService。
我现在将解释这些部分的每一个是如何在 Cinch V2 WPF 演示应用程序中实现的。
使用非核心服务加载一组图像
正如我在之前的一篇 Cinch V2 文章中提到的,Cinch V2 具有核心服务概念,例如 IMessageBoxService、ISaveFileService、IOpenFileService 等,但它也使用了非核心(应用程序特定)服务。这些应用程序特定服务是额外的接口和实现,它们也用 MeffedMVVM 属性标记,以便可以将它们导入到 ViewModel 中。
这种思维背后的基本原理是它非常可测试。想象一下,您的 ViewModel 正在从外部源(例如 Web 服务或 WCF 服务)获取数据,并且 Web/WCF 服务正在并行开发。为了测试您的 ViewModel,通过契约接口与外部代码通信是一个好主意。这不仅使客户端应用程序和 Web 服务/WCF 服务之间的契约众所周知,而且还促进了测试。如果 ViewModel 接受 ISomeInterface 服务并期望从某个地方获取数据,您可以使用真实的服务(它将调用 Web 服务/WCF 服务),或者您可以注入一个测试替身,并简单地测试您的 ViewModel,而无需依赖任何 Web 服务/WCF 服务(可能甚至还没有准备好进行测试)。这一切都与可测试性有关。
无论如何,Cinch WPF 演示代码使用了两个这样的服务,下面将介绍它们
IImageDiskOperations
ImageLoaderViewModel 使用 IImageDiskOperations 服务将图像评分保存到/从用户选择的 XML 文件中。IImageDiskOperations 服务契约如下所示
using System;
using System.Collections.Generic;
using System.Linq;
using System.Text;

namespace CinchV2DemoWPF
{
    /// <summary>
    /// Data service used by the
    /// <c>ImageLoaderViewModel</c> to carry out Save/open
    /// operations
    /// </summary>
    public interface IImageDiskOperations
    {
        /// <summary>
        /// Saves viewModelsToSave to a XML file, this demonstrates the use of
        /// the <c>SaveFileService</c> from
        /// the <c>ImageLoaderViewModel</c>
        /// </summary>
        bool Save(string fileName,
             IEnumerable<ImageViewModel> viewModelsToSave);

        /// <summary>
        /// retusn a  List<ImageViewModel>
        /// from an XML file, this demonstrates the use of
        /// the <c>OpenFileService</c> from
        /// the <c>ImageLoaderViewModel</c>
        /// </summary>
        List<ImageViewModel> Open(string fileName);
    }
}
而真实的 IImageDiskOperations(设计时也使用)实现如下所示
using System;
using System.Collections.Generic;
using System.Linq;
using System.Text;
using System.ComponentModel.Composition;
using System.Xml.Linq;
using System.Xml;

using MEFedMVVM.ViewModelLocator;

namespace CinchV2DemoWPF
{
    public static class CustomXElementExtensions
    {
        public static string SafeValue(this XElement input)
        {
            return (input == null) ? string.Empty : (string)input.Value;
        }
    }

    /// <summary>
    /// Runtime/Deigntime implementation of the
    /// ImageDiskOperations service used by
    /// the <c>ImageLoaderViewModel</c> to save/open data
    /// </summary>
    [PartCreationPolicy(CreationPolicy.Shared)]
    [ExportService(ServiceType.Both, typeof(IImageDiskOperations))]
    public class ImageDiskOperations : IImageDiskOperations
    {
        #region IImageDiskOperations Members

        /// <summary>
        /// Saves viewModelsToSave to a XML file, this demonstrates the use of
        /// the <c>SaveFileService</c>
        /// from the <c>ImageLoaderViewModel</c>
        /// </summary>
        public bool Save(string fileName,
               IEnumerable<ImageViewModel> viewModelsToSave)
        {

            CreateInitialFile(fileName, viewModelsToSave.First());
            IQueryable<ImageViewModel> allButFirst =
                viewModelsToSave.Skip(1).AsQueryable<ImageViewModel>();

            foreach (ImageViewModel imageVM in allButFirst)
            {
                AppendToFile(fileName, imageVM);
            }
            return true;
        }

        /// <summary>
        /// retusn a  List<ImageViewModel> from an XML file,
        /// this demonstrates the use of
        /// the <c>OpenFileService</c>
        /// from the <c>ImageLoaderViewModel</c>
        /// </summary>
        public List<ImageViewModel> Open(string fileName)
        {
            var xmlImageViewModelResults =
                from imageVM in StreamElements(fileName, "ImageVM")
                select new ImageViewModel
                {
                    ImagePath = imageVM.Element("ImagePath").SafeValue(),
                    FileName = imageVM.Element("FileName").SafeValue(),
                    FileDate = DateTime.Parse(imageVM.Element("FileDate").SafeValue()),
                    FileExtension = imageVM.Element("FileExtension").SafeValue(),
                    FileSize = int.Parse(imageVM.Element("FileSize").SafeValue()),
                    Rating = int.Parse(imageVM.Element("Rating").SafeValue())
                };

            return xmlImageViewModelResults.ToList();
        }

        #endregion
        #region Private Methods

        public static IEnumerable<XElement> StreamElements(string uri, string name)
        {
            using (XmlReader reader = XmlReader.Create(uri))
            {
                reader.MoveToContent();
                while (reader.Read())
                {
                    if ((reader.NodeType == XmlNodeType.Element) &&
                      (reader.Name == name))
                    {
                        XElement element = (XElement)XElement.ReadFrom(reader);
                        yield return element;
                    }
                }
                reader.Close();
            }
        }

        private static void AppendToFile(string fullXmlPath, ImageViewModel imageVM)
        {
            XElement imagesVM_XMLDocument = XElement.Load(fullXmlPath);
            imagesVM_XMLDocument.Add(new XElement("ImageVM",
                        new XElement("ImagePath", imageVM.ImagePath),
                        new XElement("FileName", imageVM.FileName),
                        new XElement("FileDate", imageVM.FileDate),
                        new XElement("FileExtension", imageVM.FileExtension),
                        new XElement("FileSize", imageVM.FileSize),
                        new XElement("Rating", imageVM.Rating)));

            imagesVM_XMLDocument.Save(fullXmlPath);
        }

        private static void CreateInitialFile(string fullXmlPath, ImageViewModel imageVM)
        {
            XElement imagesVM_XMLDocument =
                new XElement("AllImageViewModels",
                    new XElement("ImageVM",
                        new XElement("ImagePath", imageVM.ImagePath),
                        new XElement("FileName", imageVM.FileName),
                        new XElement("FileDate", imageVM.FileDate),
                        new XElement("FileExtension", imageVM.FileExtension),
                        new XElement("FileSize", imageVM.FileSize),
                        new XElement("Rating", imageVM.Rating))
                );
            imagesVM_XMLDocument.Save(fullXmlPath);
        }
        #endregion
    }
}
此 IImageDiskOperations 服务按如下方式导入到 ImageLoaderViewModel 中
[ExportViewModel("ImageLoaderViewModel")]
[PartCreationPolicy(CreationPolicy.NonShared)]
public class ImageLoaderViewModel : ViewModelBase
{

private IImageProvider imageProvider;
private IImageDiskOperations imageDiskOperations;

[ImportingConstructor]
public ImageLoaderViewModel(
    IImageProvider imageProvider,
    IImageDiskOperations imageDiskOperations)
{
    //setup services
    this.imageProvider = imageProvider;
    this.imageDiskOperations = imageDiskOperations;
}
由于 ImageLoaderViewModel 只是期望一个 IImageDiskOperations,因此在进行单元测试时,您可以轻松地向其中注入一个测试替身或模拟 IImageDiskOperations。看看这种方法的美妙之处,我认为这是 MeffedMVVM 的真正优点。
IImageProvider
IImageProvider 服务只是向 ImageLoaderViewModel 提供图像。IImageProvider 服务契约如下所示。
请注意,此服务应为异步服务,完成时会调用回调委托。
using System;
using System.Collections.Generic;
using System.Linq;
using System.Text;

namespace CinchV2DemoWPF
{
    /// <summary>
    /// Data service used by the <c>ImageLoaderViewModel</c> to obtain data
    /// </summary>
    public interface IImageProvider
    {
        void FetchImages(string imagePath,
             Action<List<ImageData>> callback);
    }

    /// <summary>
    /// Data class used by <c>IImageProvider</c>
    /// </summary>
    public class ImageData
    {
        public string ImagePath { get; set; }
        public string FileName { get; set; }
        public DateTime FileDate { get; set; }
        public string FileExtension { get; set; }
        public int FileSize { get; set; }
    }
}
真实的 IImageProvider 实现如下所示,请注意它如何使用 Cinch 多线程助手 BackgroundTaskManager<T> 来完成工作。
/// <summary>
/// Runtime implementation of the
/// Data service used by the <c>ImageLoaderViewModel</c> to obtain data
/// </summary>
[PartCreationPolicy(CreationPolicy.NonShared)]
[ExportService(ServiceType.Runtime, typeof(IImageProvider))]
public class RunTimeImageProvider : IImageProvider
{
    #region Data
    private BackgroundTaskManager<string, List<ImageData>> bgWorker =
        new BackgroundTaskManager<string, List<ImageData>>();
    #endregion

    #region Public Methods/Properties

    public void FetchImages(string imagePath,
                Action<List<ImageData>> callback)
    {
        bgWorker.TaskFunc = (argument) =>
            {
                return FetchImagesInternal(argument);
            };

        bgWorker.CompletionAction = (result) =>
            {
                callback(result);
            };

        bgWorker.WorkerArgument = imagePath;
        bgWorker.RunBackgroundTask();
    }

    /// <summary>
    /// To allow this class to be unit tested stand alone
    /// See CinchV1 articles about Unit Testing for this
    /// Or comments in Cinch BackgroundTaskManager<T> class
    /// </summary>
    public BackgroundTaskManager<string,List<ImageData>> BgWorker
    {
        get { return bgWorker; }
    }

    #endregion

    #region Private Methods
    private List<ImageData> FetchImagesInternal(string imagePath)
    {
        List<string> imageFiles = new List<string>();

        string strFilter = "*.jpg;*.png;*.gif";
        string[] filters = strFilter.Split(';');
        foreach (string filter in filters)
        {
            imageFiles.AddRange(Directory.GetFiles(imagePath, filter));
        }

        List<ImageData> images = new List<ImageData>();

        if (imageFiles.Count > 0)
        {
            int maxImages = imageFiles.Count > 20 ? 20 : imageFiles.Count;

            for (int i = 0; i < maxImages; i++)
            {
                FileInfo fi = new FileInfo(imageFiles[i]);
                ImageData id = new ImageData();
                id.ImagePath = imageFiles[i];
                id.FileDate = fi.LastWriteTime;
                id.FileExtension = fi.Extension;
                id.FileName = fi.Name;
                id.FileSize = (int)fi.Length / 1024;
                images.Add(id);
            }
        }

        return images;
    }
    #endregion
}
而设计时的 IImageProvider 服务如下所示。请注意,我们只是立即回调,我们根本不使用任何多线程。您也可以在单元测试中这样做。在单元测试中测试线程操作并不容易,通常涉及 WaitHandle 等。我留给您决定,但只是让您知道,您可以这样做,没问题。
/// <summary>
/// Designtime implementation of the
/// Data service used by the <c>ImageLoaderViewModel</c> to obtain data
/// </summary>
[PartCreationPolicy(CreationPolicy.NonShared)]
[ExportService(ServiceType.DesignTime, typeof(IImageProvider))]
public class DesigntimeImageProvider : IImageProvider
{
    #region Public Methods

    public void FetchImages(string imagePath,
           Action<List<ImageData>> callback)
    {
        List<ImageData> fakeImages = new List<ImageData>();
        for (int i = 0; i < 10; i++)
        {
            ImageData id = new ImageData();
            id.ImagePath =
              @"C:\Users\Public\Pictures\Sample Pictures\Desert.jpg";
            id.FileDate = DateTime.Now;
            id.FileExtension = "*.jpg";
            id.FileName = "Desert.jpg";
            id.FileSize = 223;
            fakeImages.Add(id);
        }
        callback(fakeImages);
    }

    #endregion
}
此 IImageProvider 服务按如下方式导入到 ImageLoaderViewModel 中
[ExportViewModel("ImageLoaderViewModel")]
[PartCreationPolicy(CreationPolicy.NonShared)]
public class ImageLoaderViewModel : ViewModelBase
{

private IImageProvider imageProvider;
private IImageDiskOperations imageDiskOperations;

[ImportingConstructor]
public ImageLoaderViewModel(
    IImageProvider imageProvider,
    IImageDiskOperations imageDiskOperations)
{
    //setup services
    this.imageProvider = imageProvider;
    this.imageDiskOperations = imageDiskOperations;
}
由于 ImageLoaderViewModel 只是期望一个 IImageProvider,因此您可以轻松地向其中注入一个测试替身或模拟 IImageProvider。
使用 SimpleCommand / CompletedAwareCommandTrigger 显示/隐藏操作区域
演示应用程序在 ImageLoaderView 上有一个不总是可见的小区域。它仅在请求了所需的 VisualState(默认是“HideActionsState”)时才可见。
我所说的区域看起来像这样,我们使用顶部的两个 Label 控件来显示/隐藏操作区域

其中有两个 Label 控件使用 EventToCommandTrigger 在 ImageLoaderViewModel 中触发 SimpleCommand。
<Label FontFamily="Wingdings" Foreground="Black"
    VerticalAlignment="Center" Margin="10,5,5,5"
    VerticalContentAlignment="Center"
    FontSize="20" FontWeight="Normal"
    Content="þ">
    <i:Interaction.Triggers>
        <i:EventTrigger EventName="MouseLeftButtonUp">
            <CinchV2:EventToCommandTrigger
                    Command="{Binding ShowActionsCommand}"/>
        </i:EventTrigger>
    </i:Interaction.Triggers>
</Label>

<Label FontFamily="Wingdings" Foreground="Black"
    VerticalAlignment="Center" Margin="5"
    VerticalContentAlignment="Center"
    FontSize="20" FontWeight="Normal"
    Content="ý">
    <i:Interaction.Triggers>
        <i:EventTrigger EventName="MouseLeftButtonUp">
            <CinchV2:EventToCommandTrigger
                    Command="{Binding HideActionsCommand}"/>
        </i:EventTrigger>
    </i:Interaction.Triggers>
</Label>
其中 ImageLoaderViewModel 中的 SimpleCommand 只是触发一个空委托。
//EventToCommand triggered, see the View
ShowActionsCommand = new SimpleCommand<Object, Object>(ExecuteShowActionsCommand);
HideActionsCommand = new SimpleCommand<Object, Object>(ExecuteHideActionsCommand);

//some reverse commands, that the VM fires, and the View uses as CompletedAwareCommandTriggers
//to carry out some actions. In this case GoToStateActions are used in the View
ShowActionsCommandReversed = new SimpleCommand<Object, Object>((input) => { });
HideActionsCommandReversed = new SimpleCommand<Object, Object>((input) => { });

....
....

/// <summary>
/// Goto "ShowActionsState", Using CompletedAwareCommandTrigger
/// </summary>
private void ExecuteShowActionsCommand(Object args)
{
    ShowActionsCommandReversed.Execute(null);
}

/// <summary>
/// Goto "HideActionsState", Using CompletedAwareCommandTrigger
/// </summary>
private void ExecuteHideActionsCommand(Object args)
{
    HideActionsCommandReversed.Execute(null);
}
然后,在 ImageLoaderView 的 XAML 中,整个 UserControl 有一些 Blend 交互,它们通过使用 CompletedAwareCommandTrigger 监听这些反向 SimpleCommand,并将 UserControl 置于新的 VisualState,这取决于从 ViewModel 触发的哪个反向 SimpleCommand 导致 CompletedAwareCommandTrigger 做出反应并更改为新的 VisualState。
<i:Interaction.Triggers>
    <CinchV2:CompletedAwareCommandTrigger
                    Command="{Binding ShowActionsCommandReversed}">
        <ei:GoToStateAction StateName="ShowActionsState"/>
    </CinchV2:CompletedAwareCommandTrigger>

    <CinchV2:CompletedAwareCommandTrigger
                    Command="{Binding HideActionsCommandReversed}">
        <ei:GoToStateAction StateName="HideActionsState"/>
    </CinchV2:CompletedAwareCommandTrigger>
</i:Interaction.Triggers>

<VisualStateManager.VisualStateGroups>
    <VisualStateGroup x:Name="RectangleStates">
        <VisualStateGroup.Transitions>
            <VisualTransition GeneratedDuration="0:0:0.5">
                <VisualTransition.GeneratedEasingFunction>
                    <ElasticEase EasingMode="EaseInOut"
                          Oscillations="5" Springiness="6"/>
                </VisualTransition.GeneratedEasingFunction>
            </VisualTransition>
        </VisualStateGroup.Transitions>
        <VisualState x:Name="ShowActionsState">
            <Storyboard>
                <DoubleAnimation Duration="0" To="1"
                    Storyboard.TargetProperty=
                       "(UIElement.RenderTransform).(ScaleTransform.ScaleX)"
                    Storyboard.TargetName="bordActions"
                    d:IsOptimized="True"/>
                <DoubleAnimation Duration="0" To="1"
                    Storyboard.TargetProperty=
                      "(UIElement.RenderTransform).(ScaleTransform.ScaleY)"
                    Storyboard.TargetName="bordActions"
                    d:IsOptimized="True"/>
            </Storyboard>
        </VisualState>
        <VisualState x:Name="HideActionsState"/>
        <VisualState x:Name="NullState"/>
    </VisualStateGroup>
</VisualStateManager.VisualStateGroups>
允许打开弹出窗口
正如你们中的一些人可能知道的,Cinch 也提供了一种显示弹出窗口的方法(我们之前也介绍过),因此将 SimpleCommand 连接到 UI 中的按钮以显示弹出窗口几乎是微不足道的。以下是您要做的
在您的 XAML 中,有一个 Button 连接到 SimpleCommand
<Button Grid.Row="0"
        Template="{StaticResource GlassButton}"
        Margin="10"
        HorizontalAlignment="Stretch"
        Command="{Binding AddImageRatingCommand}">
    <StackPanel Orientation="Horizontal">
        <Label Style="{StaticResource selectedImageLabelStyle}"
                    Content="Add Rating"/>
        <Label Style="{StaticResource selectedImageLabelStyle}"
                    FontFamily="Wingdings 2" Content="êêêêê"/>
    </StackPanel>
</Button>
其中 ImageLoaderViewModel 声明 SimpleCommand 和 SimpleCommand.Execute 处理程序,如下所示
AddImageRatingCommand = new SimpleCommand<Object, Object>(ExecuteAddImageRatingCommand);

....

/// <summary>
/// Show the AddImageRatingPopup using the IUIVisualizerService, passing
/// it a ValidatingViewModel that should validate that a valid rating between
/// 1-5 is entered by the user. If we get a valid rating then apply it to the
/// currently selected ImageViewModel
/// </summary>
private void ExecuteAddImageRatingCommand(Object args)
{
    ImageRatingViewModel imageRatingViewModel =
         new ImageRatingViewModel(messageBoxService);
    imageRatingViewModel.ImageRating.DataValue =
       ((ImageViewModel)loadedImagesCV.CurrentItem).Rating;


    bool? result = uiVisualizerService.ShowDialog(
          "AddImageRatingPopup", imageRatingViewModel);
    if (result.HasValue && result.Value)
    {
        ((ImageViewModel)loadedImagesCV.CurrentItem).Rating =
            imageRatingViewModel.ImageRating.DataValue;
    }
}
这显然依赖于 IUIVisualizerService,ImageLoaderViewModel 使用 MeffedMVVM 导入,如下所示
[ExportViewModel("ImageLoaderViewModel")]
[PartCreationPolicy(CreationPolicy.NonShared)]
public class ImageLoaderViewModel : ViewModelBase
{

private IMessageBoxService messageBoxService;
[ImportingConstructor]
public ImageLoaderViewModel(
    IMessageBoxService messageBoxService,
    IUIVisualizerService uiVisualizerService)
{
    //setup services
    this.messageBoxService = messageBoxService;
    this.uiVisualizerService = uiVisualizerService;
}
使用各种其他服务
WPF 演示应用程序还展示了如何使用其他几个核心 Cinch 服务,例如 IOpenFileService 和 ISaveFileService。让我们快速了解一下它们的实际应用
SaveFileService
由于 Cinch 提供 ISaveFileService,因此使用它几乎是微不足道的,我们只需在 ViewModel 中这样做。也可以看到此代码使用了我们之前讨论过的 IImageDiskOperations。
private void ExecuteSaveToFileCommand(Object args)
{
    saveFileService.InitialDirectory = @"C:\";
    saveFileService.OverwritePrompt = true;
    saveFileService.Filter = ".xml | XML Files";

    var result = saveFileService.ShowDialog(null);
    if (result.HasValue && result.Value == true)
    {
        try
        {
            if (imageDiskOperations.Save(saveFileService.FileName,
                loadedImages.AsEnumerable()))
            {
                messageBoxService.ShowInformation(string.Format(
                    "Successfully saved images to file\r\n{0}",
                    saveFileService.FileName));
            }
        }
        catch (Exception ex)
        {
            messageBoxService.ShowError(string.Format(
              "An error occurred saving images to file\r\n{0}",
              ex.Message));
        }
    }
}
注意:Cinch 还提供 TestSaveFileService,您可以在 Cinch V1 文章中阅读更多相关内容。
OpenFileService
由于 Cinch 提供 IOpenFileService,因此使用它几乎是微不足道的,我们只需在 ViewModel 中这样做。也可以看到此代码使用了我们之前讨论过的 IImageDiskOperations。
/// <summary>
/// Create a new List<ImageViewModel> by reading a XML file using XLINQ
/// </summary>
private void ExecuteOpenExistingFileCommand(Object args)
{
    openFileService.InitialDirectory = @"C:\";
    openFileService.Filter = ".xml | XML Files";

    var result = openFileService.ShowDialog(null);
    if (result.HasValue && result.Value == true)
    {
        try
        {
            List<ImageViewModel> xmlReadViewModels =
                  imageDiskOperations.Open(openFileService.FileName);
            if (xmlReadViewModels != null)
            {
                loadedImages = xmlReadViewModels;
                LoadedImagesCV = CollectionViewSource.GetDefaultView(loadedImages);
                if (loadedImages != null)
                    LoadedImagesCV.MoveCurrentTo(loadedImages.First());

                messageBoxService.ShowInformation(string.Format(
                    "Successfully retreived images from file\r\n{0}",
                    saveFileService.FileName));
            }
            else
            {
                messageBoxService.ShowError(string.Format(
                    "Couldn't load any images from file\r\n{0}",
                    saveFileService.FileName));
            }
        }
        catch (Exception ex)
        {
            messageBoxService.ShowError(
                string.Format("An error occurred opening file\r\n{0}",
                              ex.Message));
        }
    }
}
注意:Cinch 还提供 TestOpenFileService,您可以在 Cinch V1 文章中阅读更多相关内容。
AddImageRatingPopup / ImageRatingViewModel
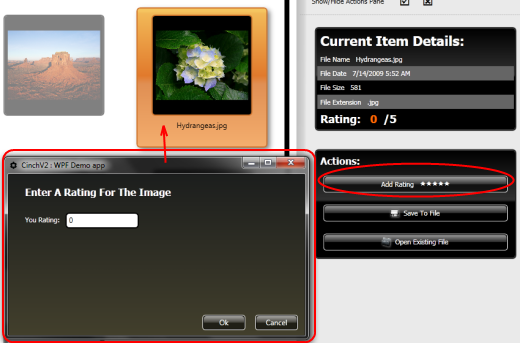
AddImageRatingPopup 只是用于为 ImageLoaderViewModel 中选定的 ImageViewModel 添加 1-5 之间的评级。因此,ImageLoaderViewModel 打开 AddImageRatingPopup 并向其推送一个新创建的 ImageRatingViewModel。以下是单击“添加评级”按钮时运行的 SimpleCommand Execute 代码。
/// <summary>
/// Show the AddImageRatingPopup using the IUIVisualizerService, passing
/// it a ValidatingViewModel that should validate that a valid rating between
/// 1-5 is entered by the user. If we get a valid rating then apply it to the
/// currently selected ImageViewModel
/// </summary>
private void ExecuteAddImageRatingCommand(Object args)
{
    ImageRatingViewModel imageRatingViewModel =
         new ImageRatingViewModel(messageBoxService);
    imageRatingViewModel.ImageRating.DataValue =
       ((ImageViewModel)loadedImagesCV.CurrentItem).Rating;

    bool? result = uiVisualizerService.ShowDialog(
          "AddImageRatingPopup", imageRatingViewModel);
    if (result.HasValue && result.Value)
    {
        ((ImageViewModel)loadedImagesCV.CurrentItem).Rating =
            imageRatingViewModel.ImageRating.DataValue;
    }
}
可以看出,创建了一个新的 ImageRatingViewModel 实例,并且其中表示当前评级的 ImageRatingViewModel ImageRating DataWrapper<T> 设置为与 ImageLoaderViewModel 中选定的 ImageViewModel 相关联的当前评级。
之后,使用 IUIVisualizerService 显示 AddImageRatingPopup 弹出窗口,其中 IUIVisualizerService 将创建弹出窗口并将其 DataContext 设置为新实例化的 ImageRatingViewModel。
所以我们现在创建了一个 AddImageRatingPopup 弹出窗口,它使用 ImageRatingViewModel 作为其 DataContext,但是 ImageRatingViewModel 有什么作用呢?嗯,让我们看看它的代码。这里是它的全部内容
/// <summary>
/// A simple ViewModel that is the ViewModel for the
/// <c>AddImageRatingPopup.xaml</c> popup window.
///
/// This example shows you you to show popups from
/// we can use a Validating ViewModel, and also how
/// to use the control focus from the ViewModel using the
/// <c>TextBoxFocusBehavior</c>.
/// It also shows how to the <c>NumericTextBoxBehaviour</c> for
/// the Rating TextBox.
/// </summary>
public class ImageRatingViewModel : ValidatingViewModelBase
{
    #region Data
    private DataWrapper<Int32> imageRating;
    private IEnumerable<DataWrapperBase> cachedListOfDataWrappers;
    private static SimpleRule imageRatingRule;
    private IMessageBoxService messageBoxService;
    #endregion

    #region Ctor

    public ImageRatingViewModel(IMessageBoxService messageBoxService)
    {
        //setup services
        this.messageBoxService = messageBoxService;

        //Commands
        SaveImageRatingCommand =
          new SimpleCommand<Object, Object>(ExecuteSaveImageRatingCommand);

        #region Create DataWrappers

        ImageRating = new DataWrapper<Int32>(this, imageRatingChangeArgs);
        ImageRating.IsEditable = true;

        //fetch list of all DataWrappers, so they can be used again later without the
        //need for reflection
        cachedListOfDataWrappers =
          DataWrapperHelper.GetWrapperProperties<ImageRatingViewModel>(this);
        #endregion

        #region Create Validation Rules

        imageRating.AddRule(imageRatingRule);
        #endregion
    }

    static ImageRatingViewModel()
    {
        imageRatingRule = new SimpleRule("DataValue",
                     "ImageRating must be between 1-5",
                    (Object domainObject)=>
                    {
                        DataWrapper<Int32> obj =
                           (DataWrapper<Int32>)domainObject;
                        return obj.DataValue < 0 || obj.DataValue > 5;
                    });
    }
    #endregion

    #region Public Properties

    //commands
    public SimpleCommand<Object, Object> SaveImageRatingCommand { get; private set; }

    /// <summary>
    /// CustomerId
    /// </summary>
    static PropertyChangedEventArgs imageRatingChangeArgs =
        ObservableHelper.CreateArgs<ImageRatingViewModel>(x => x.ImageRating);

    public DataWrapper<Int32> ImageRating
    {
        get { return imageRating; }
        private set
        {
            imageRating = value;
            NotifyPropertyChanged(imageRatingChangeArgs);
        }
    }
    #endregion

    #region Private Methods

    private void ExecuteSaveImageRatingCommand(Object args)
    {

        if (IsValid)
        {
            CloseActivePopUpCommand.Execute(true);
        }
        else
        {
            NotifyPropertyChanged(isValidChangeArgs);
            RaiseFocusEvent("ImageRating");
            messageBoxService.ShowError(
              "The Rating entered is invalid it must be between 1-5");
        }
    }

    #endregion

    #region Overrides
    /// <summary>
    /// Is the ViewModel Valid
    /// </summary>

    static PropertyChangedEventArgs isValidChangeArgs =
        ObservableHelper.CreateArgs<ImageRatingViewModel>(x => x.IsValid);

    public override bool IsValid
    {
        get
        {
            //return base.IsValid and use DataWrapperHelper, if you are
            //using DataWrappers
            return base.IsValid &&
                DataWrapperHelper.AllValid(cachedListOfDataWrappers);
        }
    }
    #endregion
}
此代码中有几点需要注意
- 它继承自
ValidatingViewModelBase,因此需要提供验证规则。 - 它使用
DataWrapper<T>作为其图像评级数据。 - 它可以使用
SetFocus事件将焦点设置到特定的TextBox,我们在此前的文章 CinchV2_3.aspx 中讨论过。 - 当弹出窗口被认为是有效时,它将使用
ViewModelBase.CloseActivePopupCommand关闭自身,这将把控制权返回给ImageLoaderViewModel,后者以模态方式显示了弹出窗口,现在可以使用从ImageLoaderViewModel传递给AddImageRatingPopup的ImageRatingViewModel中可能已修改的值。
大部分内容可以直接在上面的 ImageRatingViewModel 代码中看到,唯一看不到的是 TextBox 验证以及它如何使用焦点行为。
这是相关的 XAML
<TextBox Text="{Binding ImageRating.DataValue, UpdateSourceTrigger=LostFocus,
            ValidatesOnDataErrors=True, ValidatesOnExceptions=True}"
            Style="{StaticResource ValidatingTextBox}"
                IsEnabled="{Binding ImageRating.IsEditable}">
    <i:Interaction.Behaviors>
        <CinchV2:TextBoxFocusBehavior IsUsingDataWrappers="true" />
        <CinchV2:NumericTextBoxBehaviour/>
    </i:Interaction.Behaviors>
</TextBox>
其中名为 ValidatingTextBox 的 Style 看起来像这样
<Style x:Key="ValidatingTextBox" TargetType="{x:Type TextBoxBase}">
    <Setter Property="SnapsToDevicePixels" Value="True"/>
    <Setter Property="OverridesDefaultStyle" Value="True"/>
    <Setter Property="KeyboardNavigation.TabNavigation" Value="None"/>
    <Setter Property="FocusVisualStyle" Value="{x:Null}"/>
    <Setter Property="MinWidth" Value="120"/>
    <Setter Property="MinHeight" Value="20"/>
    <Setter Property="AllowDrop" Value="true"/>
    <Setter Property="Validation.ErrorTemplate" Value="{x:Null}"/>
    <Setter Property="Template">
        <Setter.Value>
            <ControlTemplate TargetType="{x:Type TextBoxBase}">
                <Border
                        Name="Border"
                        CornerRadius="5"
                        Padding="2"
                        Background="White"
                        BorderBrush="Black"
                        BorderThickness="2" >
                    <ScrollViewer Margin="0" x:Name="PART_ContentHost"/>
                </Border>
                <ControlTemplate.Triggers>
                    <Trigger Property="IsEnabled" Value="False">
                        <Setter TargetName="Border"
                          Property="Background" Value="LightGray"/>
                        <Setter TargetName="Border"
                          Property="BorderBrush" Value="Black"/>
                        <Setter Property="Foreground" Value="Gray"/>
                    </Trigger>
                    <Trigger Property="Validation.HasError" Value="true">
                        <Setter TargetName="Border" Property="BorderBrush"
                                Value="Red"/>
                    </Trigger>
                </ControlTemplate.Triggers>
            </ControlTemplate>
        </Setter.Value>
    </Setter>
    <Style.Triggers>
        <Trigger Property="Validation.HasError" Value="true">
            <Setter Property="ToolTip"
                        Value="{Binding RelativeSource={x:Static RelativeSource.Self},
                        Path=(Validation.Errors).CurrentItem.ErrorContent}"/>
        </Trigger>
    </Style.Triggers>
</Style>
这显然会导致在 ImageRatingViewModel 中定义的验证规则被违反时显示以下内容

AboutView / AboutViewModel

AboutView 相当简单,它只包含一个 FlowDocument,以及使用我在此处讨论过的 EventToCommandTrigger Blend 触发器的链接按钮:CinchV2_3.aspx#Interactivity。
以下是 AboutView 的相关 XAML;和以前一样,请注意 MeffedMVVM ViewModelLocator.ViewModel 附加 DP 来解析 ViewModel
<UserControl x:Class="CinchV2DemoWPF.AboutView"
             xmlns="http://schemas.microsoft.com/winfx/2006/xaml/presentation"
             xmlns:x="http://schemas.microsoft.com/winfx/2006/xaml"
             xmlns:mc="http://schemas.openxmlformats.org/markup-compatibility/2006"
             xmlns:d="http://schemas.microsoft.com/expression/blend/2008"
             xmlns:CinchV2="clr-namespace:Cinch;assembly=Cinch.WPF"
             xmlns:meffed="http:\\www.codeplex.com\MEFedMVVM"
             xmlns:local="clr-namespace:CinchV2DemoWPF;assembly="
             xmlns:i="clr-namespace:System.Windows.Interactivity;
                      assembly=System.Windows.Interactivity"
             mc:Ignorable="d"
             d:DesignHeight="371" d:DesignWidth="533"
             meffed:ViewModelLocator.ViewModel="AboutViewModel">

    <Grid>
         ......
         ......
         ......
         ......
        <Grid Grid.Column="1" Background="{StaticResource mainGridBrush}">
            <StackPanel Orientation="Vertical"
                  VerticalAlignment="Top" Margin="30">
                <Label Style="{StaticResource aboutLabelStyle}"
                         Content="Check Out Cinch:"/>
                <StackPanel Orientation="Vertical">
                    <TextBlock Style="{StaticResource aboutTextBlockStyleLinks}"
                                   Text="Home Page [At Codeplex]">
                        <i:Interaction.Triggers>
                            <i:EventTrigger EventName="MouseLeftButtonDown">
                                <CinchV2:EventToCommandTrigger
                                     Command="{Binding AboutViewEventToVMFiredCommand}"
                                     CommandParameter="Home"/>
                            </i:EventTrigger>
                        </i:Interaction.Triggers>
                    </TextBlock>
                    <TextBlock Style="{StaticResource aboutTextBlockStyleLinks}"
                                   Text="Source Code [At Codeplex]">
                        <i:Interaction.Triggers>
                            <i:EventTrigger EventName="MouseLeftButtonDown">
                                <CinchV2:EventToCommandTrigger
                                     Command="{Binding AboutViewEventToVMFiredCommand}"
                                     CommandParameter="Source"/>
                            </i:EventTrigger>
                        </i:Interaction.Triggers>
                    </TextBlock>
                </StackPanel>
            </StackPanel>
        </Grid>
    </Grid>
</UserControl>
除了使用 MeffedMVVM 进行 ViewModel 解析以及 2 个 EventToCommandTrigger 之外,并没有太多内容。所以为了完整性,让我们看看 AboutViewModel。
[ExportViewModel("AboutViewModel")]
[PartCreationPolicy(CreationPolicy.NonShared)]
public class AboutViewModel : ViewModelBase
{
    public IUIVisualizerService uiVisualizer;

    [ImportingConstructor]
    public AboutViewModel(IUIVisualizerService uiVisualizer)
    {
        this.uiVisualizer = uiVisualizer;
        AboutViewEventToVMFiredCommand =
          new SimpleCommand<Object, EventToCommandArgs>(
          ExecuteAboutViewEventToVMFiredCommand);
    }

    /// <summary>
    /// An event to command fired command, have a look at the AboutView, and look for
    /// where this command is used to see how the View can fire Commands in the ViewModel
    /// passing in Parameters
    /// </summary>
    public SimpleCommand<Object, EventToCommandArgs>
           AboutViewEventToVMFiredCommand { get; private set; }

    private void ExecuteAboutViewEventToVMFiredCommand(EventToCommandArgs args)
    {
        AboutViewLinkRequestedPopupViewModel aboutViewLinkRequestedPopupViewModel =
            new AboutViewLinkRequestedPopupViewModel();
        switch ((String)args.CommandParameter)
        {
            case "Home":
                aboutViewLinkRequestedPopupViewModel.NavigateTo =
                    @"http://cinch.codeplex.com/";
                break;
            case "Source":
                aboutViewLinkRequestedPopupViewModel.NavigateTo =
                    @"http://cinch.codeplex.com/SourceControl/list/changesets";
                break;
        }
        uiVisualizer.ShowDialog("AboutViewLinkRequestedPopup",
                                aboutViewLinkRequestedPopupViewModel);
    }
    #endregion
}
那么,这两个 XAML 声明的 EventToCommandTrigger Blend 触发器到底做了什么?嗯,它们都调用 AboutViewModel 的 AboutViewEventToVMFiredCommand SimpleCommand,并传入不同的 CommandParameter 值。然后 AboutViewModel 使用通过 MeffedMVVM 注入的 IUIVisualizerService 来显示一个名为 AboutViewLinkRequestedPopup 的弹出窗口。您可以通过阅读文章后面的 弹出窗口 部分来了解弹出窗口的工作原理。
AboutViewLinkRequestedPopup / AboutViewLinkRequestedPopupViewModel
AboutViewLinkRequestedPopup 只是在一个嵌入式 WebBrowser 中导航到请求的网页。
正如我们刚刚看到的,AboutViewModel 负责显示一个名为 AboutViewLinkRequestedPopup 的弹出窗口,这是使用 IUIVisualizerService 完成的。现在,如果我们要检查弹出窗口的 XAML,我们将看不到其中有任何 MeffedMVVM 附加 DP 来解析 ViewModel,这与之前不同。
<Window x:Class="CinchV2DemoWPF.AboutViewLinkRequestedPopup"
        xmlns="http://schemas.microsoft.com/winfx/2006/xaml/presentation"
        xmlns:x="http://schemas.microsoft.com/winfx/2006/xaml"
        Title="CinchV2 : WPF Demo app"
        Icon="/CinchV2DemoWPF;component/Images/CinchIcon.png"
        Height="700"
        Width="700"
        WindowStartupLocation="CenterOwner">
    <Grid>
        <WebBrowser x:Name="browser"  Margin="0"/>
    </Grid>
</Window>
主要原因是 Cinch 中的弹出窗口需要调用者将某些状态 (ViewModel) 推送到它们。弹出窗口操作推送到它的 ViewModel,然后很可能会关闭,但由于调用者是创建初始 ViewModel 以推送到弹出窗口的一方,因此调用者(父 ViewModel)拥有弹出窗口中在推送到弹出窗口的 ViewModel 中所做的所有更改。这就是您看不到任何 MeffedMVVM 附加 DP 的原因;基本上,弹出窗口 ViewModel 应该由其他 ViewModel 创建。
我通常的做法是将预期的服务从父 ViewModel 推送到弹出窗口的 ViewModel 中,然后使用 IUIVisualizerService 将新创建的 ViewModel 推送到弹出窗口中。这种方法确实意味着父 ViewModel 需要引用它打算推送到子 ViewModel 的服务,但嘿,我对此没意见。
实际上,有一种方法可以仍然使用 MeffedMVVM 附加 DP/属性来简单地让 MeffedMVVM 为您的预期服务注入属性设置器,但这有点高级,您可能不需要这样做。但是,如果您确实需要让 MeffedMVVM 注入属性设置器(例如用于服务),则此 Cinch 论坛帖子值得一读
https://codeproject.org.cn/Messages/3533572/Question-about-ViewModel-constructors-with-MEF.aspx
但是无论如何,我们现在暂时离题;让我们专注于正常用法,即父 ViewModel 创建一个新的弹出 ViewModel;我们在 AboutViewModel 的代码中看到了这一点,让我们快速回顾一下
private void ExecuteAboutViewEventToVMFiredCommand(EventToCommandArgs args)
{
    AboutViewLinkRequestedPopupViewModel aboutViewLinkRequestedPopupViewModel =
        new AboutViewLinkRequestedPopupViewModel();
    switch ((String)args.CommandParameter)
    {
        case "Home":
            aboutViewLinkRequestedPopupViewModel.NavigateTo =
                @"http://cinch.codeplex.com/";
            break;
        case "Source":
            aboutViewLinkRequestedPopupViewModel.NavigateTo =
                @"http://cinch.codeplex.com/SourceControl/list/changesets";

            break;
    }
    uiVisualizer.ShowDialog("AboutViewLinkRequestedPopup",
                            aboutViewLinkRequestedPopupViewModel);
}
看它是如何创建 AboutViewLinkRequestedPopupViewModel 并将其作为状态传递给 IUIVisualizerService 以用于新的弹出实例?让我们将注意力转向这个 AboutViewLinkRequestedPopupViewModel,它的全部内容如下
using System;
using System.Collections.Generic;
using System.Linq;
using System.Text;
using Cinch;
using System.ComponentModel;
using System.ComponentModel.Composition;

namespace CinchV2DemoWPF
{
    ///NOTE : As this is a popup we should not be manually setting the Views
    ///ViewModel to a pre populated ViewModel, by using the
    ///<c>WPFUIVisualizerService</c> service, as we would typically pass the
    ///popup and object to alter the state with
    public class AboutViewLinkRequestedPopupViewModel :
           ViewModelBase, IViewStatusAwareInjectionAware
    {
        #region Data
        private string navigateTo;
        #endregion

        #region Public Properties

        private IViewAwareStatus ViewAwareStatusService { get; set; }

        /// <summary>
        /// NavigateTo
        /// </summary>
        static PropertyChangedEventArgs navigateToArgs =
            ObservableHelper.CreateArgs<AboutViewLinkRequestedPopupViewModel>(
            x => x.NavigateTo);

        public string NavigateTo
        {
            get { return navigateTo; }
            set
            {
                navigateTo = value;
                NotifyPropertyChanged(navigateToArgs);
            }
        }
        #endregion

        #region IViewStatusAwareInjectionAware Members

        public void InitialiseViewAwareService(IViewAwareStatus viewAwareStatusService)
        {
            this.ViewAwareStatusService = viewAwareStatusService;
            this.ViewAwareStatusService.ViewLoaded += ViewAwareStatusService_ViewLoaded;
        }
        #endregion

        #region Private Methods

        private void ViewAwareStatusService_ViewLoaded()
        {
            //Get the View from the ViewAwareStatusService as a specific interface
            //and ask it to navigate its internal WebBrowser to the requested Url
            //Sometimes a tiny bit of code behind in the view is the correct thing
            //to do, we could abstract ourselves to insanity, but the thing is, if
            //it truly is a UI type operation and is not really something that requires
            //a lot of testing, I see nothing wrong with a tiny bit of code behind in the
            //view and that is what this is showing you
            IWebBrowserNavigatable webBrowserNavigatable =
                this.ViewAwareStatusService.View as IWebBrowserNavigatable;
            if (webBrowserNavigatable != null)
            {
                ((IWebBrowserNavigatable)webBrowserNavigatable).NavigateTo(NavigateTo);
            }
        }
        #endregion
    }
}
实际上,这里面有一些微妙之处,其中第一个是 IViewStatusAwareInjectionAware 接口的使用。它的作用是,当 IUIVisualizerService 创建一个弹出窗口时,它会检查它传入的 ViewModel,并看到它想要了解 IViewStatusAware 服务(IViewStatusAwareInjectionAware 接口告诉它),如果它想要,则将一个新的 IViewStatusAware 注入到 Viewmodel 中。
这是 IUIVisualizerService 中处理此问题的相关代码
private Window CreateWindow(string key, object dataContext, bool setOwner,
        EventHandler<UICompletedEventArgs> completedProc, bool isModal)
{
    if (string.IsNullOrEmpty(key))
        throw new ArgumentNullException("key");

    Type winType;
    lock (_registeredWindows)
    {
       if (!_registeredWindows.TryGetValue(key, out winType))
          return null;
    }

    var win = (Window)Activator.CreateInstance(winType);

    if (dataContext is IViewStatusAwareInjectionAware)
    {
        IViewAwareStatus viewAwareStatus =
           ViewModelRepository.Instance.Resolver.Container.
           GetExport<IViewAwareStatus>().Value;
        viewAwareStatus.InjectContext((FrameworkElement)win);
           ((IViewStatusAwareInjectionAware)
             dataContext).InitialiseViewAwareService(viewAwareStatus);
    }

    win.DataContext = dataContext;

    ......
    ......
    ......
}
AboutViewLinkRequestedPopupViewModel 代码中的另一个微妙之处在于,它在 IViewAwareStatus.Loaded 处理程序中做了一些奇怪的事情
private void ViewAwareStatusService_ViewLoaded()
{
    //Get the View from the ViewAwareStatusService as a specific interface
    //and ask it to navigate its internal WebBrowser to the requested Url
    //Sometimes a tiny bit of code behind in the view is the correct thing
    //to do, we could abstract ourselves to insanity, but the thing is, if
    //it truly is a UI type operation and is not really something that requires
    //a lot of testing, I see nothing wrong with a tiny bit of code behind in the
    //view and that is what this is showing you
    IWebBrowserNavigatable webBrowserNavigatable =
        this.ViewAwareStatusService.View as IWebBrowserNavigatable;
    if (webBrowserNavigatable != null)
    {
        ((IWebBrowserNavigatable)webBrowserNavigatable).NavigateTo(NavigateTo);
    }
}
看到它如何从 IViewAwareStatus 实例获取 View,并期望它是 IWebBrowserNavigatable 吗?这怎么可能?
嗯,IViewAwareStatus 服务公开了 View(使用 WeakReference),因此您可以将 View 转换为 View 可能实现的任何接口并在您的 ViewModel 中使用它。在这种情况下,AboutViewLinkRequestedPopup View 实现了 IWebBrowserNavigatable 接口,如下所示。
[PopupNameToViewLookupKeyMetadata("AboutViewLinkRequestedPopup",
        typeof(AboutViewLinkRequestedPopup))]
public partial class AboutViewLinkRequestedPopup :
    Window,
    IWebBrowserNavigatable
    //Show that sometimes code behind is the right thing to do
{

    public void NavigateTo(string url)
    {
        browser.Navigate(url);
    }
}
ViewModel 现在可以使用此 IWebBrowserNavigatable 接口与 View 进行通信。
我通常不会在我的视图上使用任何接口,但有时这样做是正确的,所以只需让你的 ViewModel 使用一个众所周知的契约(即接口)与视图进行通信。
暂时就到这里
这就是我现在想说的一切。在这个新系列中我还有一篇文章,然后就完成了。下一篇是关于 Silverlight 演示应用程序的,顺便说一句,那将是我的第 100 篇 CodeProject 文章,这非常了不起,所以如果能在那篇文章上获得一些投票/评论,那就太好了。
如果您喜欢这篇文章,并且觉得它对您有帮助,能否请您通过留下投票/评论来表示支持?
一如既往,如果您有任何与 MEF 相关的深入问题,您应该直接向 Marlon Grech 提问,可以通过他的博客 C# Disciples,或者使用 MefedMVVM CodePlex 网站;任何其他 Cinch V2 问题将在下一篇 Cinch V2 文章中回答。