
MonoAndroid:在移动应用程序中使用 TabHost
MonoAndroid 中的 TabHost 控件。
引言
这是MonoAndroid系列文章的第三篇,前两篇是通用BaseAdapter和Android Grid View。在本文中,我将演示TabHost控件的用法,它与Android移动操作系统提供的TabLayout不同。
TabHost通过提供标签式界面,灵活地管理不同视图中的数据。
TabHost基本上是一个容器,您需要在此容器中放置用于承载标签式界面的tab widget,以及用于展示不同视图的FrameLayout。请看下面的示例:

在本文中,我们将创建一个基于TabHost的印度电影明星传记应用程序。
我们将一步一步进行。
`- 选择新建 -> 解决方案来创建一个Android应用程序,并为其命名为“
TabHostDemo”。
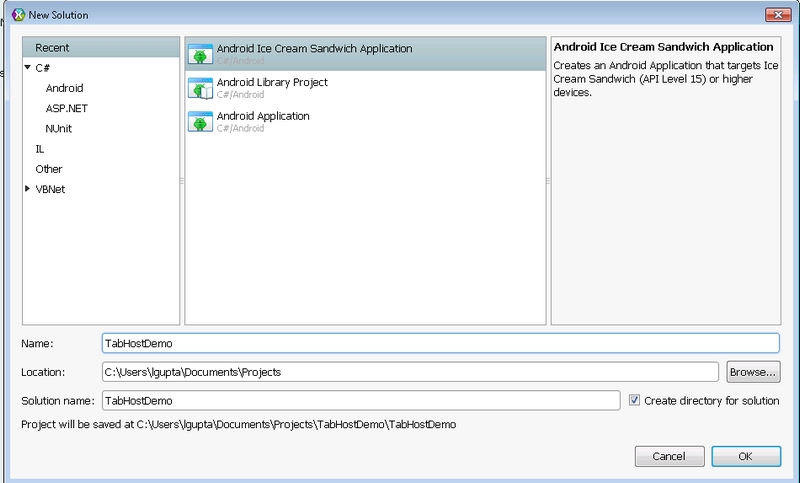
图 1:创建Android项目! - 项目创建完成后,打开资源文件夹 -> 布局,并添加一个名为tabItemLayout.axml的新文件。

图 2:选择新文件!
图 3:选择布局文件
- 在布局文件中添加以下代码:
<?xml version="1.0" encoding="utf-8"?> <ScrollView xmlns:android="http://schemas.android.com/apk/res/android" android:minWidth="25px" android:minHeight="25px" android:layout_width="fill_parent" android:layout_height="wrap_content" android:id="@+id/scrollView1"> <LinearLayout android:orientation="vertical" android:layout_width="fill_parent" android:layout_height="fill_parent" android:minWidth="25px" android:minHeight="25px"> <LinearLayout android:orientation="horizontal" android:minWidth="25px" android:minHeight="25px" android:layout_width="fill_parent" android:layout_height="wrap_content" android:id="@+id/linearLayout1"> <ImageView android:src="@android:drawable/ic_menu_gallery" android:layout_width="wrap_content" android:layout_height="fill_parent" android:id="@+id/ivFilmStar" android:adjustViewBounds="true" /> <LinearLayout android:orientation="vertical" android:minWidth="25px" android:minHeight="25px" android:layout_width="match_parent" android:layout_height="fill_parent" android:id="@+id/linearLayout2" android:layout_marginLeft="7.3dp"> <TextView android:text="Large Text" android:textAppearance="?android:attr/textAppearanceLarge" android:layout_width="fill_parent" android:layout_height="wrap_content" android:id="@+id/txtFilmStar" /> </LinearLayout> </LinearLayout> <TextView android:text="Small Text" android:textAppearance="?android:attr/textAppearanceSmall" android:layout_width="fill_parent" android:layout_height="wrap_content" android:id="@+id/txtFilmStarBio1" /> <TextView android:text="Small Text" android:textAppearance="?android:attr/textAppearanceSmall" android:layout_width="fill_parent" android:layout_height="match_parent" android:id="@+id/txtFilmStarBio2" /> </LinearLayout> </ScrollView>让我解释一下我是如何创建这个布局文件的。- 将基本布局从
LinearLayout更改为ScrollView,因为传记可能包含大量文本,所以使用ScrollView更好。 - 添加一个方向为“垂直”的
LinearLayout。 - 然后添加一个方向为“水平”的
LinearLayout,并在其中添加ImageView和TextView。 - 为电影明星传记添加两个TextView。
- 其余部分我做了一些微调,以格式化
ImageView和TextView。
看看在XamarinTm Studio Designer中,所有调整完成后它看起来是什么样子:
图 4:GridView自定义项的设计视图
- 将基本布局从
- 现在,根据上面的布局文件(
flimStarUI.cs)添加一个Activity,并在其中添加以下代码:protected override void OnCreate (Bundle bundle) { base.OnCreate (bundle); SetContentView (Resource.Layout.tabItemLayout); // Create your application here }这里我们使用SetContentView并将布局文件的资源ID传递进去,将flimStarUI与tabItemLayout.axml关联起来。
- 现在,添加一个名为FlimStarInformationModal的类,并继承自抽象泛型类
Java.Lang.Object,,这是 FlimStarInformationModal 类的代码。(与步骤2类似,不是添加布局文件,而是添加C#类文件)public class FlimStarInformationModal : Java.Lang.Object { public string FilmStarName {get;set;} public int FlimStarImageID {get;set;} public string FilmStarBio1 {get;set;} public string FilmStarBio2 {get;set;} }上述类的每个对象都将充当TabLayout的内容。 - 现在,在Main.axml布局文件中,代码如下:
<?xml version="1.0" encoding="utf-8"?> <LinearLayout xmlns:android="http://schemas.android.com/apk/res/android" android:orientation="vertical" android:layout_width="fill_parent" android:layout_height="fill_parent"> <Button android:id="@+id/myButton" android:layout_width="fill_parent" android:layout_height="wrap_content" android:text="@string/hello" /> <TabHost android:minWidth="25px" android:minHeight="25px" android:layout_width="fill_parent" android:layout_height="match_parent" android:id="@+id/tabHost1"> <LinearLayout android:layout_width="match_parent" android:layout_height="match_parent" android:orientation="vertical" android:id="@+id/linearLayout1"> <TabWidget android:id="@android:id/tabs" android:layout_width="match_parent" android:layout_height="69.3dp" /> <FrameLayout android:id="@android:id/tabcontent" android:layout_width="match_parent" android:layout_height="match_parent" /> </LinearLayout> </TabHost> </LinearLayout>- 将按钮名称重命名为
“创建 TabHost 控件”,点击按钮时,我们将动态创建TabHost。 - 现在,在布局文件中添加TabHost控件。
- 默认情况下,它会在TabHost容器下添加TabWidget和Frame Layout。
Dictionary<string,FlimStarInformationModal> dictFlimStarInfo = new Dictionary<string, FlimStarInformationModal>(); protected override void OnCreate (Bundle bundle) { base.OnCreate (bundle); // Set our view from the "main" layout resource SetContentView (Resource.Layout.Main); Button button = FindViewById<Button> (Resource.Id.myButton); button.Click += delegate { OnCreateTabHostControl(bundle); }; CreateFlimStarInformationDict (); } void CreateFlimStarInformationDict() { dictFlimStarInfo.Add ("Amitabh", new FlimStarInformationModal () { FilmStarName = "Amitabh Bachan", FlimStarImageID = Resource.Drawable.amitabh, FilmStarBio1 = "Amitabh Harivansh Bachchan (born 11 October 1942) is an Indian film actor. He first gained popularity in the early 1970s as the \"angry young man\" of Hindi cinema, and has since appeared in over 180 Indian films in a career spanning more than four decades. Bachchan is widely regarded as one of the greatest and most influential actors in the history of Indian cinema.So total was his dominance of the movie scene in the 1970s and 1980s that the French director Francois Truffaut called him a \"one-man industry\".", FilmStarBio2 = "shares with Kamal Hassan and Mammootty), a number of awards at international film festivals and award ceremonies and fourteen Filmfare Awards. He is the most-nominated performer in any major acting category at Filmfare, with 39 nominations overall. In addition to acting, Bachchan has worked as a playback singer, film producer and television presenter. He also had a stint in politics in the 1980s. The Government of India honoured him with the Padma Shri in 1984 and the Padma Bhushan in 2001 for his contributions towards the arts.", }); dictFlimStarInfo.Add ("Shahrukh", new FlimStarInformationModal () { FilmStarName = "Shahrukh Khan", FlimStarImageID = Resource.Drawable.SRK, FilmStarBio1 = "Shahrukh Khan (born 2 November 1965), often credited as Shah Rukh Khan and informally referred as SRK, is an Indian film actor. Referred to in the media as \"Badshah of Bollywood\", \"King Khan\" and \"King of Romance\", Khan has acted in 75 Hindi films in genres ranging from romantic dramas to action thrillers.[4][5][6][7] His contributions to the film industry have garnered him numerous achievements, including fourteen Filmfare Awards from thirty nominations. His eighth Filmfare Best Actor Award win made him the most awarded Bollywood actor of all time in that category, tied only with actor Dilip Kumar. In 2005, the Government of India honoured him with the Padma Shri for his contributions towards Indian cinema.", FilmStarBio2 = "Khan is considered to be one of the biggest film stars in cinematic history, with a fan following claimed to number in the billions; in 2011, the Los Angeles Times called him \"the world's biggest movie star.\"[19] He has also been regularly featured in the listing of the most powerful names in Indian Cinema and in 2008, Newsweek named him one of the 50 most powerful people in the world.[5] Khan has an estimated net worth of over US $600 million(INR25 billion).", }); dictFlimStarInfo.Add ("Hrithik", new FlimStarInformationModal () { FilmStarName = "Hrithik Roshan", FlimStarImageID = Resource.Drawable.Hrithik, FilmStarBio1 = "Hrithik Roshan (born on 10 January 1974) is an Indian film actor and professional dancer.[1][2] Having appeared as a child actor in several films throughout the 1980s, Roshan made his film debut in a leading role in Kaho Naa... Pyaar Hai in 2000. His performance in the film earned him Filmfare Awards for Best Actor and Best Male Debut. He followed it with leading roles in Fiza and Mission Kashmir (both released in 2000) and a supporting part in the blockbuster Kabhi Khushi Kabhie Gham (2001)", FilmStarBio2 = "Following through with several unnoticed performances from 2002 to 2003, he starred in the blockbusters Koi... Mil Gaya (2003) and its sequel Krrish (2006), both of which won him numerous Best Actor awards.[3] Roshan received his third Filmfare Award for Best Actor in 2006 for his performance in the action film Dhoom 2, and his fourth for Jodhaa Akbar[4] for which he was also awarded at the Golden Minbar International Film Festival. He later received further acclaim for his work in Guzaarish (2010), Zindagi Na Milegi Dobara (2011) and Agneepath (2012), his biggest commercial success so far. These accomplishments have established him as a leading contemporary actor of Hindi cinema.", }); }- 添加一个私有的字典,其中string作为键,FlimStarInformationModal作为值。
- 在按钮点击事件中,添加OnCreateTabHostControl,它将动态创建TabHost。
- 添加CreateFlimStarInformationDict方法,其中包含我们要用于在标签中显示数据的虚拟数据。
- 我在Resources->Drawable下添加了以下图片:


Amitabh Bachchan Shahrukh Khan Hrithik Roshan
- 将按钮名称重命名为
- 现在是时候添加以下代码来创建TabHost并将其与标签页关联起来了。我将在下面逐步解释代码:
LocalActivityManager localActMgr = new LocalActivityManager (this, false); localActMgr.DispatchCreate (bundle); TabHost tabHost = FindViewById<tabhost> (Resource.Id.tabHost1); tabHost.Setup (localActMgr); TabHost.TabSpec tabSpec = null; Intent intent = new Intent (); intent.SetFlags (ActivityFlags.NewTask); intent.SetClass(this,typeof(flimStarUI)); tabSpec = tabHost.NewTabSpec ("Amitabh"); tabSpec.SetContent (intent); tabSpec.SetIndicator ("Amitabh"); tabHost.AddTab (tabSpec);- 首先创建一个
LocalActivityManager对象,它将由TabHost用于设置自身,完成此步骤后,应用程序将抛出异常。 - 现在,使用
FindViewById方法查找TabHost控件,并通过传递LocalActivityManager对象来调用Setup方法。 - 现在添加一个Intent对象,类型为
flimStarUI,它将设置标签页的内容。 - 现在使用Intent内容和字符串标签指示器(例如,上面的“Amitabh”)填充
TabHost.TabSpec。 - 使用AddTab方法将标签添加到TabHost容器中。Tab Button将自动在TabWidget中创建,并使用指示器字符串作为标签。
- 首先创建一个
- 现在编译并运行应用程序,点击“On TabHost Control”按钮,您可以看到以下内容,Bingo!,我们的传记应用程序正在运行!

图 “FirstRun”
现在,我们的原始TabHost容器显示在屏幕上,带有包含演员姓名的标签式按钮。但是内容页面除了我们为
flimStarUI屏幕创建的虚拟屏幕外,没有显示任何数据。 - 现在,为了将信息从Main Activity传递到标签式内容,我们必须使用
BroadReceiver派生类来启动活动之间的通信。因此,我添加了以下类:public class MainActivityBroadcast : BroadcastReceiver { public event Action<Context,Intent> actionRecv; #region implemented abstract members of BroadcastReceiver public override void OnReceive (Context context, Intent intent) { if (this.actionRecv != null) { this.actionRecv (context, intent); } } #endregion } - 在
flimStarUI中添加以下代码,以注册并开始接收整个应用程序的事件。
在类中添加以下类变量:MainActivityBroadcast broadcastRecv; const string ACTION_NEW_TABSELECTED = "NEWTABSELECTED";
在OnCreate方法中添加以下代码:broadcastRecv = new MainActivityBroadcast (); broadcastRecv.actionRecv += OnBroadCastReceived; RegisterReceiver(broadcastRecv, new IntentFilter(ACTION_NEW_TABSELECTED));
这里,我们创建MainActivityBroadcast对象,并将actionRecv分配给委托,并使用RegisterReceiver方法,注册ACTION_NEW_TABSELECTED事件并将其与broadcastRecv对象关联起来。
现在,在OnBroadCastReceived方法中添加以下代码:void OnBroadCastReceived (Context arg1, Intent arg2) { if(arg2!=null) { var txtFilmStarInfo = FindViewById<TextView> (Resource.Id.txtFilmStar); var txtFilmStarBio1 = FindViewById<TextView> (Resource.Id.txtFilmStarBio1); var txtFilmStarBio2 = FindViewById<TextView> (Resource.Id.txtFilmStarBio2); var ivFilmStar = FindViewById<ImageView> (Resource.Id.ivFilmStar); txtFilmStarInfo.Text = arg2.GetStringExtra("FilmStarName"); ivFilmStar.SetImageResource(arg2.GetIntExtra("FlimStarImageID",-1)); txtFilmStarBio1.Text = arg2.GetStringExtra("FilmStarBio1"); txtFilmStarBio2.Text = arg2.GetStringExtra("FilmStarBio2"); } }在此方法中,我们将查找
TextView和ImageView控件,并将它们的值分配为从MainActivity发送过来的。最后添加以下代码,以便在OnResume和OnPause处理程序中注册和注销接收器。这样做是为了避免在暂停状态时接收任何事件,并节省宝贵的移动资源。protected override void OnResume () { base.OnResume (); RegisterReceiver(broadcastRecv, new IntentFilter(ACTION_NEW_TABSELECTED)); } protected override void OnPause () { base.OnPause (); UnregisterReceiver(broadcastRecv); } - 在向
flimStarUI发送消息之前,您必须处理标签按钮点击以进行标签切换。为此,您需要在MainActivity中实现TabHost.IOnTabChangeListener。这将使TabHost.IOnTabChangeListener.OnTabChanged方法出现在类中,该方法将tabId作为参数。在OnTabChanged方法中添加以下代码:void TabHost.IOnTabChangeListener.OnTabChanged (string tabId) { SendMessage (tabId); } void SendMessage (string tabId) { var newTweetsIntent = new Intent (ACTION_NEW_TABSELECTED); var cItem = dictFlimStarInfo[tabId]; newTweetsIntent.PutExtra ("FilmStarName", cItem.FilmStarName); newTweetsIntent.PutExtra("FlimStarImageID", cItem.FlimStarImageID); newTweetsIntent.PutExtra("FilmStarBio1", cItem.FilmStarBio1); newTweetsIntent.PutExtra("FilmStarBio2", cItem.FilmStarBio2); SendBroadcast (newTweetsIntent); }MainActivity类包含基于tabid作为键和相关信息作为值的
dictFlimStarInfo字典。因此,我们在SendMessage方法中所做的是:- 创建action为“NEWTABSELECTED”的Intent。
- 使用PutExtra将信息添加到Intent中。
- 使用SendBroadcast将Intent分派到Activity。
完成所有这些之后,调用TabHost.SetOnTabChangedListener (this)(因为MainActivity实现了TabHost.IOnTabChangeListener)方法来设置TabChanged侦听器。 - 现在编译并运行!(在纵向模式下)


Android 3.4 英寸 Android 4 英寸。 - 横向模式下运行应用程序
 Android 设备 7 英寸:横向
在TabButton上放置图标
- 现在,要在TabButton上添加图标,请添加与演员姓名对应的图标(第一行为活动状态,第二行包含非活动状态的图标):


Amitabh Bachan Shahrukh Khan Hrithik Roshan 


- 现在,将TabSpec.SetIndicator方法更改为包含对上述图像的引用。
tabSpec.SetIndicator ("Hrithik",Resources.GetDrawable (Resource.Drawable.Hrithik_ico));Resources.GetDrawable()方法返回基于Drawable资源的Drawable对象,该对象用于在Tab Button中显示图标。 - 编译并运行,您可以看到顶部的图像:

此示例对选定和未选定状态使用了单个图像。现在,如果您希望两者使用不同的图像,则需要使用XML来定义其状态。
- 现在,为了包含禁用图像(当Tab未被选中时),我们可以使用基于选择器的XML来定义不同状态下的图标。关于选择器,请此处阅读更多。
<?xml version="1.0" encoding="UTF-8" ?>
<selector xmlns:android="http://schemas.android.com/apk/res/android">
    <!-- When selected, use grey -->
    <item android:drawable="@drawable/Hrithik_ico"
          android:state_selected="true" />
    <!-- When not selected, use white-->
    <item android:drawable="@drawable/Hrithik_icod" />
</selector>
在这里,当Tab处于活动状态时将显示Hrithik_ico,当Tab处于非活动状态时将显示Hrithik_icod(已禁用)。同样,为其他演员制作XML。
- 现在,对步骤2中列出的代码进行以下更改:
tabSpec.SetIndicator ("Hrithik",Resources.GetDrawable (Resource.Drawable.selectHrithik));现在,使用XML资源而不是图标资源。
- 编译并运行:

关注点
我使用了MonoAndroid (C#)和Xamarin Studio来构建本教程。请留意,如果我继续学习,您可能会期待更多文章即将发布。
尽管Xamarin Studio是专有软件,但他们提供了免费的入门版本来构建、测试和发布Android应用程序。我正在使用它来学习。
本系列文章!
- MonoAndroid:用 C# 编写自定义通用 BaseAdapter
- MonoAndroid:在您的移动应用程序中使用 GridView
- MonoAndroid:在移动应用中使用 Fragments
- MonoAndroid:使用 dotnet Web 服务(ASMX)
- MonoAndroid:使用 Started Service
- MonoAndroid:调用次级活动
- MonoAndroid:用 C# 编写 ExpandableListView 和 BaseExpandableListAdapter
- MonoAndroid:使用 AlertDialog
本系列技巧/窍门
历史
- 2013年8月13日:第一个版本
- 2013年8月14日:添加了“在Tab Buttons上放置图标”部分。
- 2013年8月22日:添加了“本系列其他文章”部分。
- 2013年9月6日:添加了“本系列技巧/窍门”部分。
- 2013年10月11日:更新了文章部分。
- 2013年11月5日:更新了文章部分。
- 2013年11月22日:更新了其他文章部分