
MonoAndroid:使用 Started Service
已启动服务的演示。
引言
我将再次带来我的 **MonoAndroid** 系列文章。前几篇文章请参阅文章底部。在这篇文章中,我将演示如何在移动应用中创建已启动的服务。它类似于 Windows 服务,但有一个区别,它是由前端应用程序创建和运行的,而 Windows 服务则需要由它们自己的控制台进行安装和管理。
根据 Android 开发者指南,“服务是应用程序组件,表示应用程序在不与用户交互的情况下执行较长时间操作的意愿,或为其他应用程序提供可供使用的功能。”
服务有两种类型:已启动服务和绑定服务。“已启动服务”将一直运行,直到被要求关闭;而“绑定服务”的生命周期与其创建它的应用程序绑定。下面是已启动服务的生命周期图:

在本文中,我将创建一个名为 **“长时计算”** 的应用程序。在此应用程序中,我们将使用 `ArrayAdapter` 来模拟 `ListView` 中的数学表格。
我们将一步一步进行。
- 通过选择 **新建 -> 解决方案** 并为其命名为“`myStartedServiceApp`”来创建 Android 应用程序。
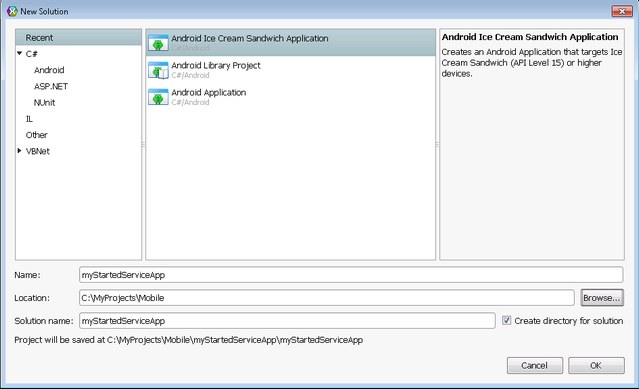
图 1:创建Android项目! - 现在,在“布局”下的 `Main.axml` 文件中进行以下更改。添加 UI 代码后,它看起来大致如下:
<?xml version="1.0" encoding="utf-8"?>
<RelativeLayout xmlns:android="http://schemas.android.com/apk/res/android"
    android:layout_width="fill_parent"
    android:layout_height="fill_parent">
    <TextView
        android:text="@string/entername"
        android:textAppearance="?android:attr/textAppearanceSmall"
        android:layout_width="110dp"
        android:layout_height="24.7dp"
        android:id="@+id/textView1"
        android:layout_marginRight="50dp" />
    <Button
        android:id="@+id/btnCalculate"
        android:layout_width="fill_parent"
        android:layout_height="31.3dp"
        android:text="@string/hello"
        android:textSize="10dp"
        android:layout_toRightOf="@+id/textView1"
        android:layout_marginBottom="0.0dp" />
    <EditText
        android:inputType="numberSigned"
        android:layout_width="110dp"
        android:layout_height="wrap_content"
        android:id="@+id/txtNumber"
        android:layout_below="@+id/textView1"
        android:layout_marginRight="50dp"
        android:layout_marginBottom="8.7dp" />
    <Button
        android:id="@+id/btnStopService"
        android:layout_width="fill_parent"
        android:layout_height="31.3dp"
        android:text="@string/StopService"
        android:textSize="10dp"
        android:layout_below="@+id/btnCalculate"
        android:layout_toRightOf="@+id/txtNumber"
        android:layout_marginBottom="0.0dp" />
    <ListView
        android:minWidth="25px"
        android:minHeight="25px"
        android:layout_width="fill_parent"
        android:layout_height="match_parent"
        android:id="@+id/LVTable"
        android:layout_below="@+id/txtNumber" />
</RelativeLayout>
在此布局中,我添加了两个按钮:一个用于启动服务,另一个用于停止服务;以及用于获取生成数学表格的数字的 EditText。完成后,UI 如下所示:

图:UI 屏幕 -
现在是时候在项目中添加 **BroadcastReceiver** 的派生类 **MyServiceBR** 了。此类将充当从服务向前端活动发送信息的媒介。添加后,代码看起来如下:
[BroadcastReceiver] public class MyServiceBR : BroadcastReceiver { public event Action<Context,Intent> OnBroadcastReceive = null; public override void OnReceive (Context context, Intent intent) { if (OnBroadcastReceive != null) OnBroadcastReceive.Invoke (context, intent); } } -
我添加了一个包含字符串常量的类,我将在整个项目中使用这些常量。代码如下:
public class MyServiceConstant
{
	public const string MSG_FROM_SERVICE ="MSG_FROM_SERVICE";
	public const string VAR_CALCNUMBER ="CalculateNumber";
	public const  string VAR_RETN_TABLE ="ReturnedTable";
}
- 现在是时候添加我们派生的服务类了,我们将其命名为 **MyStartedServiceCls**。您需要实现 `OnBind` 函数,从中可以向操作系统指示这是已启动服务还是绑定服务。如果从 `OnBind` 方法返回 NULL,则表示当前服务是已启动的服务;否则,如果您传递 `IBinder` 派生类的对象,则表示您打算创建绑定服务。所以我们在这里传递 `NULL`。
#region implemented abstract members of Service public override IBinder OnBind (Intent intent) { return null; } #endregion通常,任何服务开发者都会重写以下方法:- OnStart :所有服务初始化代码都放在这里
- OnStartCommand:每次有人调用 `StartService` 方法时都会调用此方法,因为调用参数中提供了一个 `intent`,您可以在调用时向其传递消息。
- OnDestroy :您想要执行的所有清理任务。
public override void OnStart (Intent intent, int startId){
}

public override void OnDestroy (){
            base.OnDestroy ();
}
- 现在,在我们的 **OnStartCommand** 方法中,添加以下代码:
public override StartCommandResult OnStartCommand (Intent intent, StartCommandFlags flags, int startId) { int variable = int.Parse( intent.GetStringExtra (MyServiceConstant.VAR_CALCNUMBER)); Thread tVar = new Thread(() => { for (int value = 1; value <= 10; value++) { Intent newIntent = new Intent(MyServiceConstant.MSG_FROM_SERVICE); newIntent.PutExtra(MyServiceConstant.VAR_RETN_TABLE, string.Format(" {0} X {1} = {2}", variable,value,variable*value)); SendBroadcast(newIntent); Thread.Sleep(1000); } }); tVar.Start (); return base.OnStartCommand (intent, flags, startId); }在此方法中,我们返回数学表格(我们小时候在学校学过的,任何数字的一到十的乘法)。我们从 `intent` 中检索需要生成表格的数字。然后,我们使用 **SendBroadcast** 方法广播格式化后的字符串,为了模拟长时间运行的任务,我们将每秒广播一次消息。
- 现在,在 `MainActivity.cs` 中添加以下代码:
public class MainActivity : Activity
{
        EditText _txtNumber = null;
        Button _btnCalculate =null,_btnStopService=null;
        ListView _lvTable=null;
        MyServiceBR _myServiceBR = new MyServiceBR();
        List<String> _myStringList = new List<String> ();
        Intent _serviceIntent;

// Other Methods
}
类方法及其说明:
- OnCreate:- 在此方法中,我们将初始化主屏幕上的所有 UI 控件,为 `OnBroadcastReceive` 创建事件处理程序,并使用 **RegisterReceiver** 方法注册 **MyServiceConstant.MSG_FROM_SERVICE** 的广播接收器。
protected override void OnCreate (Bundle bundle) { base.OnCreate (bundle); // Set our view from the "main" layout resource SetContentView (Resource.Layout.Main); GetUIControls (); _myServiceBR.OnBroadcastReceive += HandleOnBroadcastReceive; RegisterReceiver(_myServiceBR, new IntentFilter(MyServiceConstant.MSG_FROM_SERVICE)); } - GetUIControls :此方法将所有 UI 控件与变量关联。
void GetUIControls () { _btnCalculate = FindViewById<Button> (Resource.Id.btnCalculate); _txtNumber = FindViewById<EditText> (Resource.Id.txtNumber); _lvTable = FindViewById<ListView> (Resource.Id.LVTable); _btnStopService= FindViewById<Button> (Resource.Id.btnStopService); _btnCalculate.Click += btnCalculate_Click; _btnStopService.Click += btnStopService_Click; } - btnCalculate_Click :- 此方法将清除所有字符串列表,然后我们将创建一个 **MyStartedServiceCls** 类型的 `intent`,将其与 **EditBox** 中的文本关联,并使用 **StartService** 方法启动服务。 subsequent 对此方法的调用将调用服务的 **OnStartCommand** 方法,而不是一次又一次地启动服务。
void btnCalculate_Click (object sender, EventArgs e) { _myStringList.Clear (); _serviceIntent = new Intent (this, typeof(MyStartedServiceCls)); _serviceIntent.PutExtra (MyServiceConstant.VAR_CALCNUMBER, _txtNumber.Text); StartService (_serviceIntent); } - btnStopService_Click:此方法将停止正在运行的服务(如果您想停止它)。
void btnStopService_Click (object sender, EventArgs e) { StopService (_serviceIntent); } - HandleOnBroadcastReceive :此方法将处理由服务发送的广播,并使用服务发送的信息更新 `ListView`。
void HandleOnBroadcastReceive (Context arg1, Intent arg2)
{
        _myStringList.Add (arg2.GetStringExtra (
MyServiceConstant.VAR_RETN_TABLE));

   _lvTable.Adapter = new ArrayAdapter<string>  (this,
        Android.Resource.Layout.SimpleListItem1,
       _myStringList);

}
为了更新 `ListView`,我们使用 `ArrayAdapter`,通过传递 Android 通用布局类型 `SimpleListItem1` 和 `myStringList` 作为要更新的项目列表。
- OnCreate:- 在此方法中,我们将初始化主屏幕上的所有 UI 控件,为 `OnBroadcastReceive` 创建事件处理程序,并使用 **RegisterReceiver** 方法注册 **MyServiceConstant.MSG_FROM_SERVICE** 的广播接收器。
- 现在构建并运行应用程序,
初始屏幕 更新 更新时间 


- 如果您不停止服务,您可以在应用控制台中检查它,如下面的图像所示。(它位于设置->应用->正在运行的进程下)
图片 1 图片 2 

StartCommandResult
本节文本摘自 这里,逐字翻译。
当系统内存不足时,Android 可能会停止任何正在运行的服务。
当服务被系统停止时,Android 将使用 `OnStartCommand` 的返回值来确定服务应该如何或是否应该重新启动。此值为 `StartCommandResult` 类型,可以是以下任一类型:
| 返回类型 | 描述 |
| Sticky | 粘性服务将被重启,并且在重启时会向 `OnStartCommand` 传递一个空 `intent`。当服务持续执行长时间运行的操作时使用,例如更新股票行情。 |
| RedeliverIntent | 服务将被重启,并且服务被系统停止前传递给 `OnStartCommand` 的最后一个 `intent` 将被重新传递。用于继续长时间运行的命令,例如大文件上传的完成。 |
| NotSticky | 服务不会自动重启。 |
| StickyCompatibility | 在 API 级别 5 或更高版本上,重启行为将类似于 Sticky;但在早期版本上,行为将降级到级别 5 之前的行为。 |
关注点
我使用 **MonoAndroid for C#** 和 Xamarin Studio 构建了本教程。请留意,如果我继续学习,您可能会很快看到更多文章。
尽管Xamarin Studio是专有软件,但他们提供了免费的入门版本来构建、测试和发布Android应用程序。我正在使用它来学习。
本系列文章!
- MonoAndroid:用 C# 编写自定义通用 BaseAdapter
- MonoAndroid:在您的移动应用程序中使用 GridView
- MonoAndroid:在移动应用程序中使用 TabHost
- MonoAndroid:在移动应用中使用 Fragments
- MonoAndroid:使用 dotnet Web 服务(ASMX)
- MonoAndroid:调用次级活动
- MonoAndroid:用 C# 编写 ExpandableListView 和 BaseExpandableListAdapter
- MonoAndroid:使用 AlertDialog
本系列技巧/窍门
历史
- 2013 年 9 月 4 日:初版
- 2013 年 9 月 6 日:更新了文章和技巧/窍门部分
- 2013年10月11日:更新了文章部分。
- 2013年11月5日:更新了文章部分。
- 2013年11月22日:更新了其他文章部分