
MonoAndroid:使用 AlertDialog
演示如何在 Android 环境中使用 Alert-Dialog 的文章。
引言
在本文中,我将演示如何使用 AlertDialog,它用于向用户显示自定义消息,并且具有高度的可扩展性。通常,您可以设置最多三个具有自定义文本和相应处理程序的按钮,就像 Android 中的一切都是异步的一样。
本文分为三个部分:
- 原始 AlertBox - 使用 alertDialog 的常规方式
- 带 ListView 的 AlertBox - 包含 listview 的 AlertDialog
- 带自定义布局的 AlertBox - AlertDialog 包含自定义布局。
AlertBox 是 Android 世界中最常用的控件之一。它无处不在。我每天在我妻子手机上玩游戏时都会遇到它,它会问:“你确定要 退出 吗”。
我们将一步一步进行。
- 通过选择 新建 -> 解决方案 并为其命名“AndroidAlertDialogDemo”来创建 Android 应用程序。

- 项目创建完成后,打开资源文件夹->布局并编辑 Main.Axml 布局文件。我们将在其中添加三个按钮,修改后的代码如下:
<?xml version="1.0" encoding="utf-8"?>
<LinearLayout xmlns:android="http://schemas.android.com/apk/res/android"
    android:orientation="vertical"
    android:layout_width="fill_parent"
    android:layout_height="fill_parent">
    <Button
        android:id="@+id/myButton"
        android:layout_width="fill_parent"
        android:layout_height="wrap_content"
        android:text="Base AlertBox" />
    <Button
        android:id="@+id/myButton1"
        android:layout_width="fill_parent"
        android:layout_height="wrap_content"
        android:text="AlertBox with ListView" />
    <Button
        android:id="@+id/myButton2"
        android:layout_width="fill_parent"
        android:layout_height="wrap_content"
        android:text="AlertBox with CustomView" />
</LinearLayout>
在这里,我添加了一个相对布局,并在其中添加了三个按钮,每个按钮对应文章的一个部分。
- 现在,打开 MainActivity.cs 文件,找到
button1对象并为其添加点击事件处理程序,以从它调用基础 AlertDialog。Button btnNormalDialog = FindViewById<Button> (Resource.Id.myButton); btnNormalDialog.Click += methodInvokeBaseAlertDialog;
- 现在在点击处理程序中,设置 AlertDialog 调用代码,先看看代码:
void methodInvokeBaseAlertDialog (object sender, EventArgs e)
{
 var dlgAlert = (new AlertDialog.Builder (this)).Create ();
 dlgAlert.SetMessage ("Hello from alertDialog");
 dlgAlert.SetTitle ("Alert Dialog");
 dlgAlert.SetButton ("OK", handllerNotingButton);
 dlgAlert.SetButton2 ("Cancel", handllerNotingButton);
 dlgAlert.SetButton3 ("Nothing", handllerNotingButton);
 dlgAlert.Show ();
}


void handllerNotingButton (object sender, DialogClickEventArgs e)
{
	AlertDialog objAlertDialog = sender as AlertDialog;
	Button btnClicked = objAlertDialog.GetButton (e.Which);
	Toast.MakeText (this, "you clicked on " + btnClicked.Text, ToastLength.Long).Show ();
}
我们正在执行以下操作:
- 使用 (AlertDialog.Builder(this)) 静态方法创建 AlertDialog Builder 对象。
- 使用 builder 对象创建 AlertDialog 对象。
- 使用 SetMessage 和 SetTitle 分别设置正文消息和标题。
- 现在使用特定的方法 SetButton、SetButton2 和 SetButton3 设置三个按钮。后两个是可选的。 SetButton* 方法包含两个参数:一个是显示的字符串文本,第二个是其 onClick 处理程序。
- 在 OnClick 处理程序中,我们使用 Toast 来显示按钮文本。
- 最后,使用 Show() 方法显示 AlertDialog。
- 构建并运行 DEMO I
演示 1
演示 1 

- 现在在第二部分,我们将在 AlertDialog 中显示 ListView 。为此,您需要创建一个 BaseAdapter 并将其连接到 ListView 。要做到这一点,您需要创建一个 BaseAdapter,代码如下:
internal class AlertListViewAdapter: BaseAdapter<string> { Activity _context = null; List<String> _lstDataItem = null; public AlertListViewAdapter (Activity context, List<String> lstDataItem) { _context = context; _lstDataItem = lstDataItem; } #region implemented abstract members of BaseAdapter public override long GetItemId (int position) { return position; } public override View GetView (int position, View convertView, ViewGroup parent) { if (convertView == null) convertView = _context.LayoutInflater.Inflate (Android.Resource.Layout.SimpleListItem1, null); (convertView.FindViewById<TextView> (Android.Resource.Id.Text1)) .SetText (this [position], TextView.BufferType.Normal); return convertView; } public override int Count { get { return _lstDataItem.Count; } } #endregion #region implemented abstract members of BaseAdapter public override string this [int index] { get { return _lstDataItem [index]; } } #endregion }您可以在这里 阅读更多关于在 ListView 中创建和使用 BaseAdapter 的信息。
- 现在在 MainActivity.cs 文件中,为第二个按钮添加 EventHandller ,并在处理程序中添加以下代码:
btnNormalDialog = FindViewById<Button> (Resource.Id.myButton1);
btnNormalDialog.Click += methodInvokeAlertDialogWithListView;
同时创建字符串类型的通用集合列表的本地字段。此集合将包含要在 listview 中显示的项目。
_lstDataItem.Add ("Person 1"); _lstDataItem.Add ("Person 2"); _lstDataItem.Add ("Person 3"); _lstDataItem.Add ("Person 4"); -
要在 AlertDialog 中添加 listview,您将首先创建一个 ListView 对象,将其附加到适配器,最后使用 SetView 方法将 ListView 附加到 AlertDialog。
 #region ListView AlertDialog

	void methodInvokeAlertDialogWithListView (object sender, EventArgs e)
	{
		var dlgAlert = (new AlertDialog.Builder (this)).Create ();
		dlgAlert.SetTitle ("List View Alert Dialog");
		var listView = new ListView (this);
		listView.Adapter = new AlertListViewAdapter (this, _lstDataItem);
		listView.ItemClick += listViewItemClick;
		dlgAlert.SetView (listView);
		dlgAlert.SetButton ("OK", handllerNotingButton);
		dlgAlert.Show ();
	}

	void listViewItemClick (object sender, AdapterView.ItemClickEventArgs e)
	{
		Toast.MakeText (this, "you clicked on " + _lstDataItem [e.Position], ToastLength.Short).Show ();
	}

#endregion
我在这里的 Toast 中显示了选中的项目。
- 构建并运行 DEMO II
演示 2 演示 2 
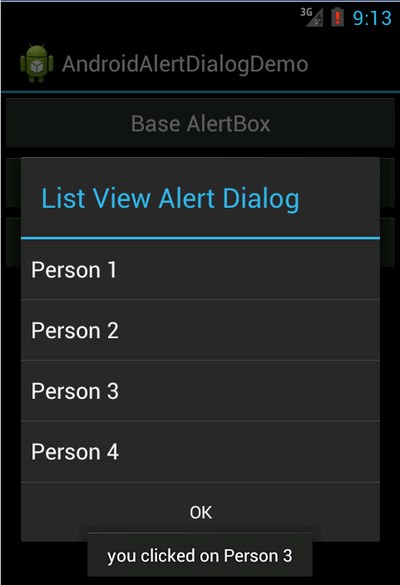
第二张图片是点击“Person 3” 列表项的结果。
- 在演示 III 中,我们将在 alert dialog 中包含自定义布局。为此,在布局文件夹中,添加一个名为 AlertDialogLayout.axml 的新布局文件。以下是该文件的 xml 代码:
<?xml version="1.0" encoding="utf-8"?>
<LinearLayout xmlns:android="http://schemas.android.com/apk/res/android"
    android:orientation="vertical"
    android:layout_width="fill_parent"
    android:layout_height="fill_parent">
    <RelativeLayout
        android:minWidth="25px"
        android:minHeight="25px"
        android:layout_width="fill_parent"
        android:layout_height="110.7dp"
        android:id="@+id/relativeLayout1">
        <ImageView
            android:src="@android:drawable/ic_menu_gallery"
            android:id="@+id/imageView1"
            android:layout_width="75.3dp"
            android:layout_height="wrap_content" />
        <TextView
            android:text="Medium Text"
            android:textAppearance="?android:attr/textAppearanceMedium"
            android:layout_width="146.0dp"
            android:layout_height="90.7dp"
            android:id="@+id/textView1"
            android:layout_toRightOf="@+id/imageView1"
            android:layout_marginRight="10.7dp" />
        <ImageView
            android:src="@android:drawable/ic_menu_gallery"
            android:id="@+id/imageView2"
            android:layout_width="75.3dp"
            android:layout_toRightOf="@+id/textView1"
            android:layout_height="wrap_content" />
    </RelativeLayout>
</LinearLayout>
我使用以下步骤创建了上面的布局:
- 首先添加 Relative Layout
- 现在将 ImageView(id:
imageView1)放入相对布局中。 - 然后将 TextView(id:
textView1)放在imageView1的右侧。 - 将另一个 ImageView(id:
imageView2)放在textView1的右侧。
- 由于我在上面的布局中使用了两张图片,因此我在项目中包含了以下两张图片:
Resource.Drawable.Icon1 Resource.Drawable.Icon2 

- 现在在相关的按钮点击处理程序中添加以下代码:
void methodInvokeAlertDialogWithCustomView (object sender, EventArgs e)
{
	var dlgAlert = (new AlertDialog.Builder (this)).Create ();
	dlgAlert.SetTitle ("Sample Alert Dialog");
	var viewAD = this.LayoutInflater.Inflate (Resource.Layout.AlertDialogLayout, null);

	viewAD.FindViewById<TextView> (Resource.Id.textView1).SetText ("Message From Layout",TextView.BufferType.Normal);
	viewAD.FindViewById<ImageView> (Resource.Id.imageView1).SetImageResource(Resource.Drawable.Icon1);
	viewAD.FindViewById<ImageView> (Resource.Id.imageView2).SetImageResource(Resource.Drawable.Icon2);

	dlgAlert.SetView (viewAD);
	dlgAlert.SetButton ("OK", handllerNotingButton);
	dlgAlert.Show ();
}
以下是上述代码的解释:
- 使用 LayoutInflater.Inflate 方法将 AlertDialogLayout 充气到相关的 View 对象(对象:
viewAD)。 - 使用 FindViewById 方法在相关的控件中设置文本和图像。
- 使用 AlertDialog 对象 SetView 方法,将
viewAD视图设置在 AlertDialog 中。
- 使用 LayoutInflater.Inflate 方法将 AlertDialogLayout 充气到相关的 View 对象(对象:
- 构建并运行 DEMO III
演示 2 
关注点
我使用了MonoAndroid (C#)和Xamarin Studio来构建本教程。请留意,如果我继续学习,您可能会期待更多文章即将发布。
虽然 Xamarin Studio 是专有软件,但他们提供了免费的入门版本来构建、测试和发布 Android 应用程序。我正在使用它来学习,并在此处创建分步教程。
本系列文章!
- MonoAndroid:在您的移动应用程序中使用 GridView
- MonoAndroid:在移动应用程序中使用 TabHost
- MonoAndroid:在移动应用中使用 Fragments
- MonoAndroid:使用 dotnet Web 服务(ASMX)
- MonoAndroid:使用 Started Service
- MonoAndroid:调用次级活动
- MonoAndroid:用 C# 编写自定义通用 BaseAdapter
- MonoAndroid:用 C# 编写 ExpandableListView 和 BaseExpandableListAdapter
本系列技巧/窍门
历史
- 2013 年 11 月 22 日:第一个版本