
RESTful 日常 #2:在 Web API 中使用 Unity Container 和 Bootstrapper 通过依赖注入实现控制反转
4.94/5 (85投票s)
我的文章将解释如何使我们的 Web API 服务架构松耦合且更灵活。
- 下载 databasescript.zip - 1 KB
- 下载 PdfArticle.zip - 3 MB
- 下载 WebApiSourceCodeDay1 - 4 MB
- 下载 WebApi.zip 源代码 - 4.4 MB
目录
引言
我的文章将解释如何使我们的 Web API 服务架构松耦合且更灵活。在我们上一篇文章中,我们已经学习了如何使用 Asp.net Web API 和 Entity Framework 创建 RESTful 服务。如果您还记得,我们最终提出的解决方案存在设计缺陷,我们将尝试通过解决相关组件的依赖关系来克服这个缺陷。对于那些没有阅读我之前文章的读者,可以通过我第一篇文章中附带的示例项目来学习。

有多种方法可以用来解决组件的依赖关系。在我的文章中,我将解释如何借助 Microsoft Unity Application Block 提供的 Unity Container 来解决依赖关系。
我们不会深入探讨非常详细的理论,关于 DI 和 IOC 的理论和理解,您可以参考以下链接:Unity 和 控制反转(IOC)。我们将直接进入实际实现。
路线图

我们学习 RESTful API 的路线图保持不变,
- RESTful 第 1 天:使用 Entity Framework、通用仓库模式和工作单元的 Web API 企业级应用程序架构。
- RESTful 第 2 天:使用 Unity 容器和引导程序在 Web API 中使用依赖注入实现控制反转。
- RESTful 第 3 天:使用 Unity 容器和托管可扩展性框架 (MEF) 在 Asp.net Web API 中使用控制反转和依赖注入解决依赖关系的依赖关系。
- RESTful 第 4 天:使用 MVC 4 Web API 中的属性路由进行自定义 URL 重写/路由。
- RESTful 第 5 天:使用 Action Filter 在 Web API 中实现基本身份验证和基于令牌的自定义授权。
- RESTful 第 6 天:使用 Action Filter、异常过滤器和 NLog 在 Web API 中进行请求日志记录和异常处理/日志记录。
- RESTful 第 7 天:使用 NUnit 和 Moq 框架在 WebAPI 中进行单元测试和集成测试(第 1 部分)。
- RESTful 第 8 天:使用 NUnit 和 Moq 框架在 WebAPI 中进行单元测试和集成测试(第 2 部分)。
- RESTful Day #9:在ASP.NET Web API中扩展OData支持
- RESTful 第 10 天:在 Visual Studio 2010 中创建带有 CRUD 操作的自托管 ASP.NET WebAPI
我将特意使用 Visual Studio 2010 和 .NET Framework 4.0,因为在 .NET Framework 4.0 中,有些实现很难找到,但我会通过展示如何做到这一点来使其变得容易。
现有设计和问题
我们已经有了一个现有的设计。如果您打开解决方案,您会看到如下结构,

模块之间的依赖关系如下:

结构上没有问题,但它们之间交互的方式确实有问题。您可能已经注意到,我们正在尝试与层进行通信,创建类的具体对象。
例如:
Controller 的构造函数创建一个 Service 层的对象进行通信,
        /// <summary>
        /// Public constructor to initialize product service instance
        /// </summary>
        public ProductController()
        {
            _productServices =new ProductServices();
        }
Service 的构造函数又创建一个 UnitOfWork 对象以与数据库通信,
        /// <summary>
        /// Public constructor.
        /// </summary>
        public ProductServices()
        {
            _unitOfWork = new UnitOfWork();
        }
问题就出在这些代码片段中。我们看到 Controller 依赖于 Service 的实例化,而 Service 依赖于 UnitOfWork 的实例化。我们的层不应该是如此紧密耦合,也不应该是相互依赖的。
创建对象的任务应该交给别人来完成。我们的层不应该担心创建对象。
我们将把这个角色分配给一个第三方,我们称之为容器。幸运的是,Unity 为我们提供了帮助,通过构造函数或属性注入依赖,而不是通过 new 创建对象,从而摆脱这种依赖问题并反转控制流。还有其他方法,但我不会深入探讨。
Unity 简介
您可以从这个链接阅读有关 Unity 的信息;我只是引用几段话,

“Unity Application Block (Unity) 是一个轻量级、可扩展的依赖注入容器,支持构造函数注入、属性注入和方法调用注入。它为开发人员提供了以下优势:
- 它简化了对象的创建,特别是对于分层对象结构和依赖关系,从而简化了应用程序代码。
- 它支持需求的抽象;这允许开发人员在运行时或配置中指定依赖关系,并简化了横切关注点的管理。
- 它通过将组件配置推迟到容器来提高灵活性。
- 它具有服务定位功能;这允许客户端存储或缓存容器。这在 ASP.NET Web 应用程序中尤其有用,开发人员可以将容器持久化到 ASP.NET 会话或应用程序中。”
设置 Unity
打开您的 Visual Studio,我使用的是 VS 2010。您可以使用 VS 2010 或更高版本。加载解决方案。
步骤 1: 导航到 Tools-> Library Packet Manager - > Packet manager Console,

我们将为 Unity Application Block 添加程序包。
在 Visual Studio 的左下角,您会找到输入命令的地方。
键入命令 Install-Package Unity.MVC3,在执行命令之前,选择“WebApi”项目。

然后键入命令 Install-Package Unity.WebAPI -Version 0.10.0 来安装 Unity.WebApi,并以与 Unity.MVC3 相同的方式选择 WebApi 项目。
您可以在同一个项目中使用 Unity.WebAPI 和 Unity.Mvc3,但您需要修改我们获得的启动类(Bootstrapper class),使其能够同时使用这两个库。安装完这两个程序包后,将 Bootstrapper.cs 文件中的 Initialise 方法更改为以下内容:
public static void Initialise()
{
    var container = BuildUnityContainer();

    DependencyResolver.SetResolver(new Unity.Mvc3.UnityDependencyResolver(container));
    GlobalConfiguration.Configuration.ServiceResolver.SetResolver(
      new Unity.WebApi.UnityDependencyResolver(container));
}
步骤 2: Bootstrapper 类
Unity.MVC3 带有一个 Bootstrapper 类,在您运行命令后,Bootstrapper 类将生成在您的 solution->WebAPI 项目中。
using System.Web.Http;
using System.Web.Mvc;
using BusinessServices;
using DataModel.UnitOfWork;
using Microsoft.Practices.Unity;
using Unity.Mvc3;

namespace WebApi
{
    public static class Bootstrapper
    {
        public static void Initialise()
        {
            var container = BuildUnityContainer();

            DependencyResolver.SetResolver(new UnityDependencyResolver(container));

            // register dependency resolver for WebAPI RC
            GlobalConfiguration.Configuration.DependencyResolver = new Unity.WebApi.UnityDependencyResolver(container);
        }

        private static IUnityContainer BuildUnityContainer()
        {
            var container = new UnityContainer();

            // register all your components with the container here
            // it is NOT necessary to register your controllers

            // e.g. container.RegisterType<ITestService, TestService>();
            container.RegisterType<IProductServices, ProductServices>().RegisterType<UnitOfWork>(new HierarchicalLifetimeManager());

            return container;
        }
    }
}

此类包含一个初始配置来设置您的容器。所有功能都是内置的,我们只需要在“BuildUnityContainer”中指定我们需要解决的依赖项,正如注释中所示:
            // register all your components with the container here
            // it is NOT necessary to register your controllers

            // e.g. container.RegisterType<ITestService, TestService>();
步骤 3: 只需在这些注释行下方指定我们需要解决的组件。在我们的例子中,它是 ProductServices 和 UnitOfWork,因此只需添加:
container.RegisterType<IProductServices, ProductServices>().RegisterType<UnitOfWork>(new HierarchicalLifetimeManager());
"HierarchicalLifetimeManager" , 对于这个生命周期管理器, as for the ContainerControlledLifetimeManager, Unity returns the same instance of the registered type or object each time you call the Resolve or ResolveAll method or when the dependency mechanism injects instances into other classes. The distinction is that when there are child containers, each child resolves its own instance of the object and does not share one with the parent. When resolving in the parent, the behavior is like a container controlled lifetime; when resolving the parent and the child you have different instances with each acting as a container-controlled lifetime. If you have multiple children, each will resolve its own instance.
如果找不到 "UnitOfWork",只需在 WebAPI 项目中添加对 DataModel 项目的引用。
所以我们的 Bootstrapper 类变成了:
   public static class Bootstrapper
    {
        public static void Initialise()
        {
            var container = BuildUnityContainer();

            DependencyResolver.SetResolver(new UnityDependencyResolver(container));

            // register dependency resolver for WebAPI RC
            GlobalConfiguration.Configuration.DependencyResolver = new Unity.WebApi.UnityDependencyResolver(container);
        }

        private static IUnityContainer BuildUnityContainer()
        {
            var container = new UnityContainer();

            // register all your components with the container here
            // it is NOT necessary to register your controllers

            // e.g. container.RegisterType<ITestService, TestService>();
            container.RegisterType<IProductServices, ProductServices>().RegisterType<UnitOfWork>(new HierarchicalLifetimeManager());

            return container;
        }
这样,我们也可以在 BuildUnityContainerMethod 中指定其他依赖对象。
步骤 4:现在我们需要调用 Bootstrapper 类的 Initialise 方法。请注意,我们需要在模块加载后立即获得对象,因此我们需要容器在应用程序加载时执行其工作。因此,转到 Global.asax 文件并添加一行来调用 Initialise 方法。由于这是一个静态方法,我们可以直接使用类名调用它:
Bootstrapper.Initialise();
我们的 global.asax 变成:
using System.Linq;
using System.Web.Http;
using System.Web.Mvc;
using System.Web.Optimization;
using System.Web.Routing;
using Newtonsoft.Json;
using WebApi.App_Start;

namespace WebApi
{
    // Note: For instructions on enabling IIS6 or IIS7 classic mode,
    // visit http://go.microsoft.com/?LinkId=9394801

    public class WebApiApplication : System.Web.HttpApplication
    {
        protected void Application_Start()
        {
            AreaRegistration.RegisterAllAreas();

            WebApiConfig.Register(GlobalConfiguration.Configuration);
            FilterConfig.RegisterGlobalFilters(GlobalFilters.Filters);
            RouteConfig.RegisterRoutes(RouteTable.Routes);
            BundleConfig.RegisterBundles(BundleTable.Bundles);
            //Initialise Bootstrapper
            Bootstrapper.Initialise();

            //Define Formatters
            var formatters = GlobalConfiguration.Configuration.Formatters;
            var jsonFormatter = formatters.JsonFormatter;
            var settings = jsonFormatter.SerializerSettings;
            settings.Formatting = Formatting.Indented;
            // settings.ContractResolver = new CamelCasePropertyNamesContractResolver();
            var appXmlType = formatters.XmlFormatter.SupportedMediaTypes.FirstOrDefault(t => t.MediaType == "application/xml");
            formatters.XmlFormatter.SupportedMediaTypes.Remove(appXmlType);

            //Add CORS Handler
            GlobalConfiguration.Configuration.MessageHandlers.Add(new CorsHandler());
        }
    }
}
一半的工作完成了。现在我们需要修改我们的 controller 和 Service 类构造函数,以利用应用程序加载时已为它们创建的实例。
设置 Controller
我们已经将 unity 设置到了我们的应用程序中。有多种方法可以注入依赖,例如构造函数注入、属性注入、通过服务定位器。我在这里使用构造函数注入,因为它是我发现的与 Unity Container 一起解决依赖的最佳方法。
只需转到您的 ProductController,您会发现您的构造函数是这样写的:
        /// <summary>
        /// Public constructor to initialize product service instance
        /// </summary>
        public ProductController()
        {
            _productServices =new ProductServices();
        }
只需在您的构造函数中添加一个参数,该参数接受您的 ProductServices 引用,就像我们在下面所做的:
       /// <summary>
        /// Public constructor to initialize product service instance
        /// </summary>
        public ProductController(IProductServices productServices)
        {
            _productServices = productServices;
        }
并将您的 "productServices" 变量初始化为该参数。在这种情况下,当控制器构造函数被调用时,它将接收一个预先实例化的服务实例,而无需创建服务的实例,我们的 unity 容器已经完成了对象创建的工作。
设置 Services
对于 Services,我们也以同样的方式进行。只需打开您的 ProductServices 类,我们在这里看到对 UnitOfWork 的依赖:
        /// <summary>
        /// Public constructor.
        /// </summary>
        public ProductServices()
        {
            _unitOfWork = new UnitOfWork();
        }
同样,我们执行相同的步骤,并将 UnitOfWork 类型的参数传递给我们的构造函数:
我们的代码变成:
        /// <summary>
        /// Public constructor.
        /// </summary>
        public ProductServices(UnitOfWork unitOfWork)
        {
            _unitOfWork = unitOfWork;
        }
在这里,我们也将获得预先实例化的 UnitOfWork 对象。因此,服务不需要担心创建对象。记住我们在 Bootstrapper 类中进行了 .RegisterType<UnitOfWork>()。
现在我们已经使我们的组件独立。

运行应用程序
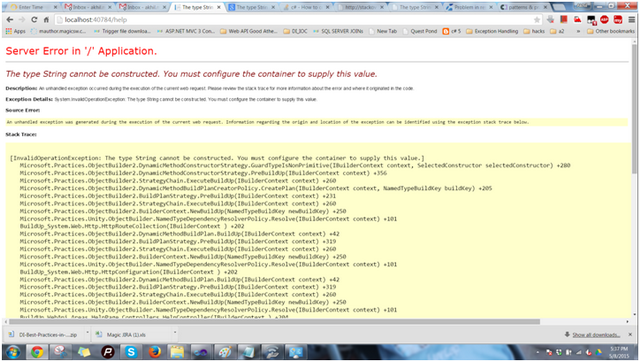
我们的工作几乎完成了。我们需要运行应用程序,只需按 F5。出乎意料的是,我们会遇到一个错误页面:
您还记得在我第一篇文章中,我们为项目添加了一个测试客户端来测试我们的 API 吗?那个测试客户端也有一个控制器,我们需要覆盖它的设置才能让我们的应用程序正常工作。只需像下面这样,在 WebAPI 项目中导航到 Areas->HelpPage->Controllers->HelpController:

注释掉现有的构造函数,并添加一个 Configuration 属性,如下所示:
      //Remove constructors and existing Configuration property.

        //public HelpController()
        //    : this(GlobalConfiguration.Configuration)
        //{
        //}

        //public HelpController(HttpConfiguration config)
        //{
        //    Configuration = config;
        //}

        //public HttpConfiguration Configuration { get; private set; }

        /// <summary>
        /// Add new Configuration Property
        /// </summary>
        protected static HttpConfiguration Configuration
        {
            get { return GlobalConfiguration.Configuration; }
        }
我们的控制器代码变成:
using System;
using System.Web.Http;
using System.Web.Mvc;
using WebApi.Areas.HelpPage.Models;

namespace WebApi.Areas.HelpPage.Controllers
{
    /// <summary>
    /// The controller that will handle requests for the help page.
    /// </summary>
    public class HelpController : Controller
    {
        //Remove constructors and existing Configuration property.

        //public HelpController()
        //    : this(GlobalConfiguration.Configuration)
        //{
        //}

        //public HelpController(HttpConfiguration config)
        //{
        //    Configuration = config;
        //}

        //public HttpConfiguration Configuration { get; private set; }

        /// <summary>
        /// Add new Configuration Property
        /// </summary>
        protected static HttpConfiguration Configuration
        {
            get { return GlobalConfiguration.Configuration; }
        }

        public ActionResult Index()
        {
            return View(Configuration.Services.GetApiExplorer().ApiDescriptions);
        }

        public ActionResult Api(string apiId)
        {
            if (!String.IsNullOrEmpty(apiId))
            {
                HelpPageApiModel apiModel = Configuration.GetHelpPageApiModel(apiId);
                if (apiModel != null)
                {
                    return View(apiModel);
                }
            }

            return View("Error");
        }
    }
}
运行应用程序,我们得到:

我们已经添加了我们的测试客户端,但对于新读者,我将再次解释如何为 API 项目添加测试客户端。
只需右键单击 WebAPI 项目,然后转到 Manage Nuget Packages,并在在线包的搜索框中键入 WebAPITestClient:

您将得到“ASP.NET Web API 的简单测试客户端”,只需添加它。您将在 Areas-> HelpPage 中得到一个帮助控制器,如下所示:

我已经在之前的文章中提供了数据库脚本和数据,您可以使用相同的。
在应用程序 URL 中追加 "/help",您将获得测试客户端,

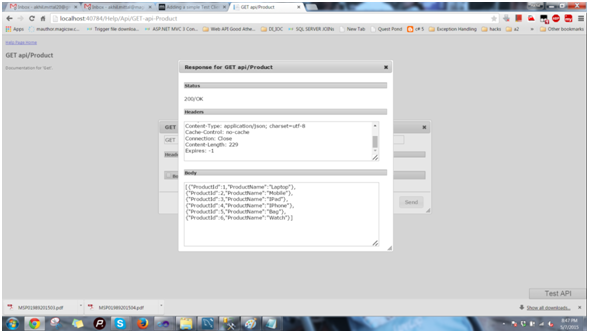
您可以点击每个服务进行测试。一旦您点击服务链接,您将被重定向到该特定服务的测试页面。在该页面右下角有一个 Test API 按钮,只需按该按钮即可测试您的服务:

GetAllProduct 服务:
对于创建一个新产品:

在数据库中,我们得到新产品:

更新产品。

我们在数据库中得到:

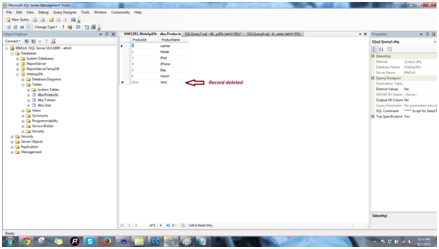
删除产品。

在数据库中。
工作完成。

设计缺陷
如果我说这个设计仍然存在缺陷,设计仍然不是松耦合的,那该怎么办?
您还记得我们在编写第一个应用程序时做了什么决定吗?
我们的 API 与 Services 通信,Services 与 DataModel 通信。出于安全原因,我们绝不允许 DataModel 与 API 通信。但是您注意到,当我们在 Bootstrapper 类中注册类型时,我们也注册了 UnitOfWork 的类型,这意味着我们将 DataModel 添加为我们 API 项目的引用。这是一个设计违规。我们试图通过违反设计和损害安全性来解决依赖项的依赖项。
在我的下一篇文章中,我们将克服这种情况,我们将尝试在不违反设计和损害安全性的情况下解决依赖项及其依赖项。事实上,我们将使其更安全、更松耦合。
在我的下一篇文章中,我们将使用托管可扩展性框架 (MEF) 来实现相同的目标。
结论
现在我们知道如何使用 Unity 容器来解决依赖关系并实现控制反转。
但是这个设计仍然存在一些缺陷。在我下一篇文章中,我将尝试让系统更强大。在此之前,祝您编码愉快 :) 您也可以从GitHub下载源代码。如果源代码中缺少所需的程序包,请添加它们。
我的其他系列文章
MVC: https://codeproject.org.cn/Articles/620195/Learning-MVC-Part-Introduction-to-MVC-Architectu
OOP: https://codeproject.org.cn/Articles/771455/Diving-in-OOP-Day-Polymorphism-and-Inheritance-Ear