
RESTful 第 4 天:在 MVC 4 Web API 中使用属性路由进行自定义 URL 重写/路由
4.94/5 (69投票s)
在本文中,我将解释如何使用属性路由编写自己的自定义路由。
目录
- 目录
- 引言
- 路线图
- 路由
- 现有设计和问题
- 属性路由
- 设置 REST 端点/WebAPI 项目以定义路由
- 更多路由约束
- RoutePrefix:在控制器级别进行路由
- RoutePrefix:版本控制
- RoutePrefix:覆盖
- 禁用默认路由
- 运行应用程序
- 结论
- 参考文献
引言
我们已经学了很多关于 WebAPI 的知识。我之前已经解释过如何创建 WebAPI,如何使用 Entity Framework 将其与数据库连接,如何使用 Unity Container 和 MEF 解析依赖项。在我们所有的示例应用程序中,我们都使用了 MVC 为 CRUD 操作提供的默认路由。在本文中,我将解释如何使用属性路由编写自己的自定义路由。我们将处理操作级别路由和控制器级别路由。我将通过一个示例应用程序详细解释这一点。我的新读者可以使用他们已有的任何 Web API 示例,或者您也可以使用我们在我之前的文章中开发的示例应用程序。
路线图

让我们回顾一下我关于 Web API 的路线图,
这是我学习 RESTful API 的路线图,
- RESTful 第 1 天:使用 Entity Framework、通用仓库模式和工作单元的 Web API 企业级应用程序架构。
- RESTful 第 2 天:使用 Unity 容器和引导程序在 Web API 中使用依赖注入实现控制反转。
- RESTful 第 3 天:使用 Unity 容器和托管可扩展性框架 (MEF) 在 Asp.net Web API 中使用控制反转和依赖注入解决依赖关系的依赖关系。
- RESTful 第 4 天:使用 MVC 4 Web API 中的属性路由进行自定义 URL 重写/路由。
- RESTful 第 5 天:使用 Action Filter 在 Web API 中实现基本身份验证和基于令牌的自定义授权。
- RESTful 第 6 天:使用 Action Filter、异常过滤器和 NLog 在 Web API 中进行请求日志记录和异常处理/日志记录。
- RESTful 第 7 天:使用 NUnit 和 Moq 框架在 WebAPI 中进行单元测试和集成测试(第 1 部分)。
- RESTful 第 8 天:使用 NUnit 和 Moq 框架在 WebAPI 中进行单元测试和集成测试(第 2 部分)。
- RESTful Day #9:在ASP.NET Web API中扩展OData支持.
- RESTful 第 10 天:在 Visual Studio 2010 中创建带有 CRUD 操作的自托管 ASP.NET WebAPI
我将特意使用 Visual Studio 2010 和 .NET Framework 4.0,因为在 .NET Framework 4.0 中,有些实现很难找到,但我会通过展示如何做到这一点来使其变得容易。
路由

从通用角度来看,任何服务、API、网站的路由都是一种模式定义系统,它试图映射来自客户端的所有请求,并通过为该请求提供一些响应来解析该请求。在 WebAPI 中,我们可以在 WebAPIConfig 文件中定义路由,这些路由定义在内部的路由表中。我们可以在该表中定义多组路由。
现有设计和问题
我们已经有了一个现有的设计。如果您打开解决方案,您会看到如下结构,
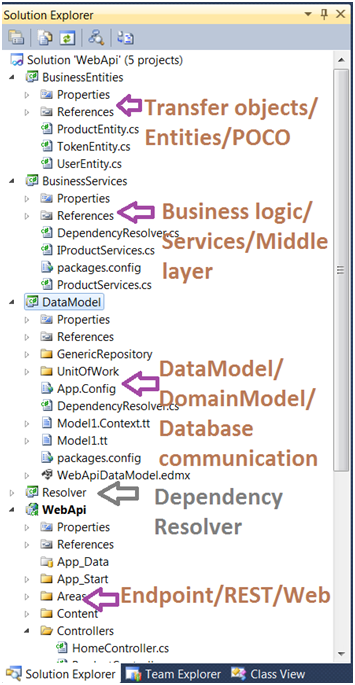
在我们的现有应用程序中,我们创建了 WebAPI,其中包含 WebApi 项目的 App_Start 文件夹中名为 WebApiConfig 的文件里提到的默认路由。路由在 Register 方法中定义如下:
config.Routes.MapHttpRoute(
                name: "DefaultApi",
                routeTemplate: "api/{controller}/{id}",
                defaults: new { id = RouteParameter.Optional }
            );
不要被 MVC 路由混淆,因为我们使用的是 MVC 项目,所以我们也在 RouteConfig.cs 文件中定义了 MVC 路由,如下所示:
public static void RegisterRoutes(RouteCollection routes)
        {
            routes.IgnoreRoute("{resource}.axd/{*pathInfo}");

            routes.MapRoute(
                name: "Default",
                url: "{controller}/{action}/{id}",
                defaults: new { controller = "Home", action = "Index", id = UrlParameter.Optional }
            );
        }
我们需要关注第一个,即 WebAPI 路由。正如您在下图中所看到的,每个属性的含义如下:

我们有一个路由名称,一个通用的路由模式,以及提供可选参数的选项。
由于我们的应用程序没有特定的不同操作名称,并且我们使用 HTTP VERBS 作为操作名称,因此我们没有过多关注路由。我们的操作名称如下:
1.	public HttpResponseMessage Get()
2.	public HttpResponseMessage Get(int id)
3.	public int Post([FromBody] ProductEntity productEntity)
4.	public bool Put(int id, [FromBody]ProductEntity productEntity)
5.	public bool Delete(int id)
定义的默认路由不考虑 HTTP VERBS 操作名称,而是将它们视为默认操作,因此它不在 routeTemplate 中包含 {action}。但这并非没有限制,我们可以拥有在 WebApiConfig 中定义的我们自己的路由,例如,查看以下路由:

  public static void Register(HttpConfiguration config)
        {
            config.Routes.MapHttpRoute(
                name: "DefaultApi",
                routeTemplate: "api/{controller}/{id}",
                defaults: new { id = RouteParameter.Optional }
            );

            config.Routes.MapHttpRoute(
               name: "ActionBased",
               routeTemplate: "api/{controller}/{action}/{id}",
               defaults: new { id = RouteParameter.Optional }
           );
            config.Routes.MapHttpRoute(
              name: "ActionBased",
              routeTemplate: "api/{controller}/action/{action}/{id}",
              defaults: new { id = RouteParameter.Optional }
          );
        }
等等。在上述路由中,如果我们有自定义操作,也可以包含操作名称。
因此,在 WebAPI 中定义路由没有限制。但有一些限制,请注意,我们正在谈论 WebAPI 1,我们在 Visual Studio 2010 中与 .NET Framework 4.0 一起使用它。Web API 2 已经克服了这些限制,并提供了我将在本文中解释的解决方案。让我们看看这些路由的限制:

是的,这是我在 Web API 1 中提到的限制。
如果我们有类似 routeTemplate: "api/{controller}/{id}" 或 routeTemplate: "api/{controller}/{action}/{id}" 或 routeTemplate: "api/{controller}/action/{action}/{id}" 的路由模板,
我们永远无法拥有自定义路由,而必须遵循 MVC 提供的旧路由约定。假设项目的客户端想要公开服务的多个端点,他无法做到。我们也无法为路由定义自己的名称,因此有很多限制。
假设我们想为我的 Web API 端点拥有以下类型的路由,其中我还可以定义版本:
v1/Products/Product/allproducts
v1/Products/Product/productid/1
v1/Products/Product/particularproduct/4
v1/Products/Product/myproduct/<带范围>
v1/Products/Product/create
v1/Products/Product/update/3
等等,那么我们无法在现有模型中实现这一点。
幸运的是,这些问题已经在 WebAPI 2 中通过 MVC 5 得到了解决,但对于这种情况,我们有 AttributeRouting 来解决和克服这些限制。
属性路由
Attribute Routing 主要是用于在控制器级别、操作级别创建自定义路由。我们可以使用 Attribute Routing 定义多个路由。我们也可以拥有路由的版本,总之,我们已经解决了现有问题。让我们直接开始如何在现有项目中实现这一点。我不会解释如何创建 WebAPI,您可以参考我的系列文章的第一篇。
步骤 1:打开解决方案,然后打开程序包管理器控制台,如下图所示,
转到工具 -> 库程序包管理器 -> 程序包管理器控制台
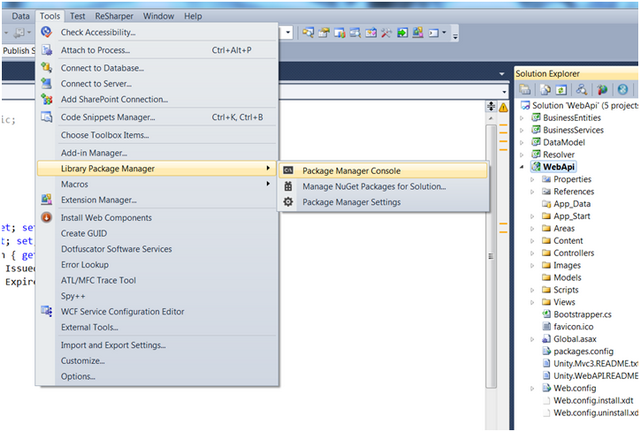
步骤 2:在 Visual Studio 左上角的程序包管理器控制台窗口中,键入 Install-Package AttributeRouting.WebApi,然后选择 WebApi 项目或您正在使用其他代码示例的 API 项目,然后按 Enter。

步骤 3:程序包安装完成后,您会在 App_Start 文件夹中看到一个名为 AttributeRoutingHttpConfig.cs 的类。

此类有自己的 RegisterRoutes 方法,该方法会内部映射属性路由。它有一个启动方法,该方法会拾取 GlobalConfiguration 中定义的 Routes 并调用 RegisterRoutes 方法,
using System.Web.Http;
using AttributeRouting.Web.Http.WebHost;

[assembly: WebActivator.PreApplicationStartMethod(typeof(WebApi.AttributeRoutingHttpConfig), "Start")]

namespace WebApi
{
    public static class AttributeRoutingHttpConfig
	{
		public static void RegisterRoutes(HttpRouteCollection routes)
		{
			// See http://github.com/mccalltd/AttributeRouting/wiki for more options.
			// To debug routes locally using the built in ASP.NET development server, go to /routes.axd

            routes.MapHttpAttributeRoutes();
		}

        public static void Start()
		{
            RegisterRoutes(GlobalConfiguration.Configuration.Routes);
        }
    }
}
我们甚至不需要触碰这个类,我们的自定义路由将通过这个类自动处理。我们只需要专注于定义路由。无需编码 :) 您现在可以使用路由特定的内容,如路由名称、谓词、约束、可选参数、默认参数、方法、路由区域、区域映射、路由前缀、路由约定等。
设置 REST 端点/WebAPI 项目以定义路由
我们完成了 90% 的工作。

我们现在需要设置我们的 WebAPI 项目并定义我们的路由。
我们现有的 ProductController 类看起来如下:
using System.Collections.Generic;
using System.Linq;
using System.Net;
using System.Net.Http;
using System.Web.Http;
using BusinessEntities;
using BusinessServices;

namespace WebApi.Controllers
{
    public class ProductController : ApiController
    {

        private readonly IProductServices _productServices;

        #region Public Constructor

        /// <summary>
        /// Public constructor to initialize product service instance
        /// </summary>
        public ProductController(IProductServices productServices)
        {
            _productServices = productServices;
        }

        #endregion

        // GET api/product
        public HttpResponseMessage Get()
        {
            var products = _productServices.GetAllProducts();
            var productEntities = products as List<ProductEntity> ?? products.ToList();
            if (productEntities.Any())
                return Request.CreateResponse(HttpStatusCode.OK, productEntities);
            return Request.CreateErrorResponse(HttpStatusCode.NotFound, "Products not found");
        }

        // GET api/product/5
        public HttpResponseMessage Get(int id)
        {
            var product = _productServices.GetProductById(id);
            if (product != null)
                return Request.CreateResponse(HttpStatusCode.OK, product);
            return Request.CreateErrorResponse(HttpStatusCode.NotFound, "No product found for this id");
        }

        // POST api/product
        public int Post([FromBody] ProductEntity productEntity)
        {
            return _productServices.CreateProduct(productEntity);
        }

        // PUT api/product/5
        public bool Put(int id, [FromBody] ProductEntity productEntity)
        {
            if (id > 0)
            {
                return _productServices.UpdateProduct(id, productEntity);
            }
            return false;
        }

        // DELETE api/product/5
        public bool Delete(int id)
        {
            if (id > 0)
                return _productServices.DeleteProduct(id);
            return false;
        }
    }
}
其中我们有一个名为 Product 的控制器,以及以 Verbs 命名的操作。当我们运行应用程序时,只会得到以下类型的端点(请忽略端口和 localhost 设置,因为我是从本地环境运行此应用程序),
获取所有产品
按 ID 获取产品
创建产品
https://:40784/api/Product(带 JSON 正文)
更新产品。
https://:40784/api/Product/3(带 JSON 正文)
删除产品。
步骤 1:在控制器中添加两个命名空间,
using AttributeRouting;
using AttributeRouting.Web.Http;
步骤 2:使用不同的路由装饰您的操作,

如上图所示,我定义了一个名为 productid 的路由,它以 id 作为参数。我们还必须在路由旁边提供谓词(GET、POST、PUT、DELETE、PATCH),如图像所示。所以它是 [GET("productid/{id?}")]。您可以为您的 Action 定义任何您想要的路由,例如 [GET("product/id/{id?}")], [GET("myproduct/id/{id?}")] 以及更多。
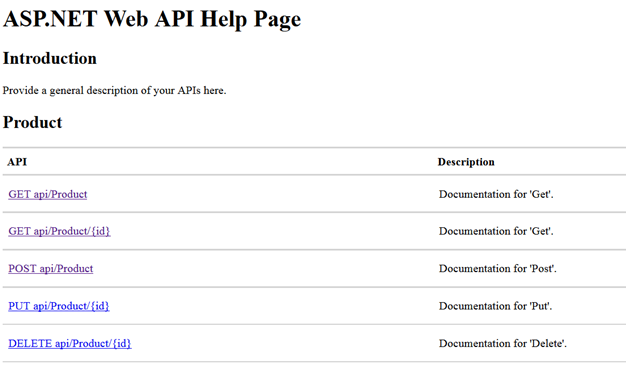
现在当我运行应用程序并导航到 /help 页面时,我会看到这个,

也就是说,我为获取产品 ID 获得了一个额外的路由。当您测试此服务时,您会看到您想要的 URL 类似于:https://:55959/Product/productid/3,这听起来就像真正的 REST :)
同样,使用多个路由装饰您的 Action,如下所示:
        // GET api/product/5
        [GET("productid/{id?}")]
        [GET("particularproduct/{id?}")]
        [GET("myproduct/{id:range(1, 3)}")]
        public HttpResponseMessage Get(int id)
        {
            var product = _productServices.GetProductById(id);
            if (product != null)
                return Request.CreateResponse(HttpStatusCode.OK, product);
            return Request.CreateErrorResponse(HttpStatusCode.NotFound, "No product found for this id");
        }

因此,我们看到,我们可以拥有自定义路由名称,也可以为单个 Action 定义多个端点。这很令人兴奋。每个端点都会不同,但会提供相同的结果集。
- {id?}:这里的 ‘?’ 表示参数是可选的。
- [GET("myproduct/{id:range(1, 3)}")],表示在此范围内的产品 ID 才会被显示。
更多路由约束
您可以利用 Attribute Routing 提供的众多路由约束。我将以其中一些为例:
Range
要获取范围内的产品,我们可以定义该值,前提是它存在于数据库中。
        [GET("myproduct/{id:range(1, 3)}")]
        public HttpResponseMessage Get(int id)
        {
            var product = _productServices.GetProductById(id);
            if (product != null)
                return Request.CreateResponse(HttpStatusCode.OK, product);
            return Request.CreateErrorResponse(HttpStatusCode.NotFound, "No product found for this id");
        }
正则表达式
您也可以更有效地使用它来处理文本/字符串参数。
        [GET(@"id/{e:regex(^[0-9]$)}")]
        public HttpResponseMessage Get(int id)
        {
            var product = _productServices.GetProductById(id);
            if (product != null)
                return Request.CreateResponse(HttpStatusCode.OK, product);
            return Request.CreateErrorResponse(HttpStatusCode.NotFound, "No product found for this id");
        }

e.g. [GET(@"text/{e:regex(^[A-Z][a-z][0-9]$)}")]
可选参数和默认参数
您也可以将服务参数标记为可选。例如,您想通过姓名从数据库中获取员工详细信息,
[GET("employee/name/{firstname}/{lastname?}")]
public string GetEmployeeName(string firstname, string lastname="mittal")
{
   …………….
  ……………….
}
在上述代码中,我通过使用问号 ‘?’ 将姓氏标记为可选,以获取员工详细信息。我的最终用户可以选择是否提供姓氏。
因此,上述端点可以通过 GET 谓词和 URL 访问:
~/employee/name/akhil/mittal
~/employee/name/akhil
如果定义的路由参数被标记为可选,您还必须为该方法参数提供一个默认值。
在上面的例子中,我将“lastname”标记为可选,因此在方法参数中提供了默认值,如果用户不发送任何值,将使用“mittal”。
在 .NET 4.5 Visual Studio > 2010 和 WebAPI 2 中,您也可以将 DefaultRoute 定义为属性,您可以自己尝试一下。使用属性 [DefaultRoute] 来定义默认路由值。
您可以尝试为所有控制器操作提供自定义路由。
我将我的操作标记为:
        // GET api/product
        [GET("allproducts")]
        [GET("all")]
        public HttpResponseMessage Get()
        {
            var products = _productServices.GetAllProducts();
            var productEntities = products as List<ProductEntity> ?? products.ToList();
            if (productEntities.Any())
                return Request.CreateResponse(HttpStatusCode.OK, productEntities);
            return Request.CreateErrorResponse(HttpStatusCode.NotFound, "Products not found");
        }

        // GET api/product/5
        [GET("productid/{id?}")]
        [GET("particularproduct/{id?}")]
        [GET("myproduct/{id:range(1, 3)}")]
        public HttpResponseMessage Get(int id)
        {
            var product = _productServices.GetProductById(id);
            if (product != null)
                return Request.CreateResponse(HttpStatusCode.OK, product);
            return Request.CreateErrorResponse(HttpStatusCode.NotFound, "No product found for this id");
        }

        // POST api/product
        [POST("Create")]
        [POST("Register")]
        public int Post([FromBody] ProductEntity productEntity)
        {
            return _productServices.CreateProduct(productEntity);
        }

        // PUT api/product/5
        [PUT("Update/productid/{id}")]
        [PUT("Modify/productid/{id}")]
        public bool Put(int id, [FromBody] ProductEntity productEntity)
        {
            if (id > 0)
            {
                return _productServices.UpdateProduct(id, productEntity);
            }
            return false;
        }

        // DELETE api/product/5
        [DELETE("remove/productid/{id}")]
        [DELETE("clear/productid/{id}")]
        [PUT("delete/productid/{id}")]
        public bool Delete(int id)
        {
            if (id > 0)
                return _productServices.DeleteProduct(id);
            return false;
        }
因此,我们得到路由:
GET

POST / PUT / DELETE

查看更多约束这里。
您必须会看到每个路由中的“v1/Products”,这是由于我在控制器级别使用了 RoutePrefix。让我们详细讨论 RoutePrefix。
RoutePrefix:在控制器级别进行路由
我们为每个操作添加了特定的路由,但您猜怎么着,我们也可以为控制器添加特定的路由名称,我们可以通过使用 AttributeRouting 的 RoutePrefix 属性来实现。我们的控制器名为 Product,我想在每个操作之前添加 Products/Product,因此,无需在每个操作中重复代码,我可以通过如下所示用此名称装饰我的 Controller 类:
    [RoutePrefix("Products/Product")]
    public class ProductController : ApiController
    {
现在,由于我的控制器被标记为此路由,它也会将其添加到每个操作中。例如,以下操作的路由:
        [GET("allproducts")]
        [GET("all")]
        public HttpResponseMessage Get()
        {
            var products = _productServices.GetAllProducts();
            var productEntities = products as List<ProductEntity> ?? products.ToList();
            if (productEntities.Any())
                return Request.CreateResponse(HttpStatusCode.OK, productEntities);
            return Request.CreateErrorResponse(HttpStatusCode.NotFound, "Products not found");
        }
现在变成:
~/Products/Product/allproducts
~/Products/Product/all
RoutePrefix:版本控制
RoutePrefix 也可以用于端点的版本控制,例如在我的代码中,我在 RoutePrefix 中提供了“v1”作为版本,如下所示:
    [RoutePrefix("v1/Products/Product")]
    public class ProductController : ApiController
    {
因此,“v1”将被添加到服务的每个路由/端点。当我们发布下一个版本时,我们可以肯定地单独维护一个更改日志,并将端点标记为控制器级别的“v2”,这将把“v2”添加到所有操作中,
例如:
~/v1/Products/Product/allproducts
~/v1/Products/Product/all

~/v2/Products/Product/allproducts
~/v2/Products/Product/all
RoutePrefix:覆盖
此功能存在于 .NET 4.5 和 Visual Studio > 2010 配合 WebAPI 2 中。您可以在那里进行测试。
可能会出现我们不想为每个操作都使用 RoutePrefix 的情况。AttributeRouting 也提供了这种灵活性,即使控制器级别存在 RoutePrefix,单个操作也可以拥有自己的路由。它只需要覆盖默认路由,如下所示:
控制器中的 RoutePrefix
     [RoutePrefix("v1/Products/Product")]
    public class ProductController : ApiController
    {
操作的独立路由
       [Route("~/MyRoute/allproducts")]
        public HttpResponseMessage Get()
        {
            var products = _productServices.GetAllProducts();
            var productEntities = products as List<ProductEntity> ?? products.ToList();
            if (productEntities.Any())
                return Request.CreateResponse(HttpStatusCode.OK, productEntities);
            return Request.CreateErrorResponse(HttpStatusCode.NotFound, "Products not found");
        }
禁用默认路由
您可能会想,在服务帮助页面上的所有 URL 列表中,我们看到了一些不同/其他我们没有通过属性路由定义的路由,它们以 ~/api/Product 开头。这些路由是我们从 WebApiConfig 文件中提供的默认路由的结果,还记得吗?如果您想摆脱那些不必要的路由,只需进入 Appi_Start 文件夹下的 WebApiConfig.cs 文件,注释掉 Register 方法中写的所有内容,
            //config.Routes.MapHttpRoute(
            //    name: "DefaultApi",
            //    routeTemplate: "api/{controller}/{id}",
            //    defaults: new { id = RouteParameter.Optional }
            //);
您也可以删除整个 Register 方法,但为此您需要从 Global.asax 文件中删除对其的调用。
运行应用程序
运行应用程序,我们得到:

我们已经添加了测试客户端,但对于新读者,只需右键单击 WebAPI 项目,转到管理 Nuget 包,然后在在线包的搜索框中键入 WebAPITestClient,
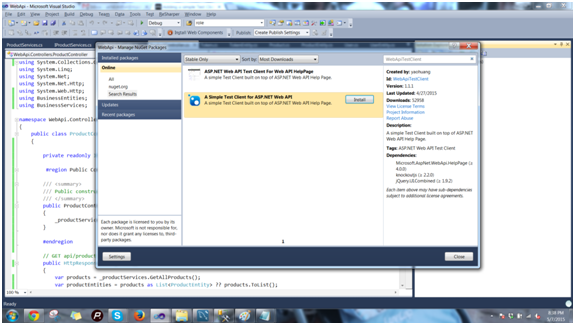
您将得到“ASP.NET Web API 的简单测试客户端”,只需添加它。您将在 Areas-> HelpPage 中得到一个帮助控制器,如下所示:

我已经在之前的文章中提供了数据库脚本和数据,您可以使用相同的。

在应用程序 URL 中追加 "/help",您将获得测试客户端,
GET
POST

PUT

删除

您可以通过单击来测试每个服务。一旦您点击服务链接,您将被重定向到该特定服务的测试页面。在该页面右下角有一个“测试 API”按钮,只需按下该按钮即可测试您的服务,

用于获取所有产品的服务,


同样,您可以测试所有服务端点。

结论
我们现在知道如何定义我们的自定义端点及其好处。我只想说这个库是由 Tim Call(http://attributerouting.net 的作者)引入的,并且 Microsoft 已将其默认包含在 WebAPI 2 中。我的下一篇文章将介绍使用 WepAPI 中的 ActionFilters 进行基于令牌的身份验证。在此之前,祝您编码愉快 :) 您也可以从GitHub 下载完整的源代码。添加缺少的必要程序包。
点击Github Repository 浏览完整的源代码。
参考文献
http://blogs.msdn.com/b/webdev/archive/2013/10/17/attribute-routing-in-asp-net-mvc-5.aspx
https://github.com/mccalltd/AttributeRouting
我的其他系列文章
MVC:https://codeproject.org.cn/Articles/620195/Learning-MVC-Part-Introduction-to-MVC-Architectu
OOP:https://codeproject.org.cn/Articles/771455/Diving-in-OOP-Day-Polymorphism-and-Inheritance-Ear